 |  |
Glue and Case Water Tightness Story
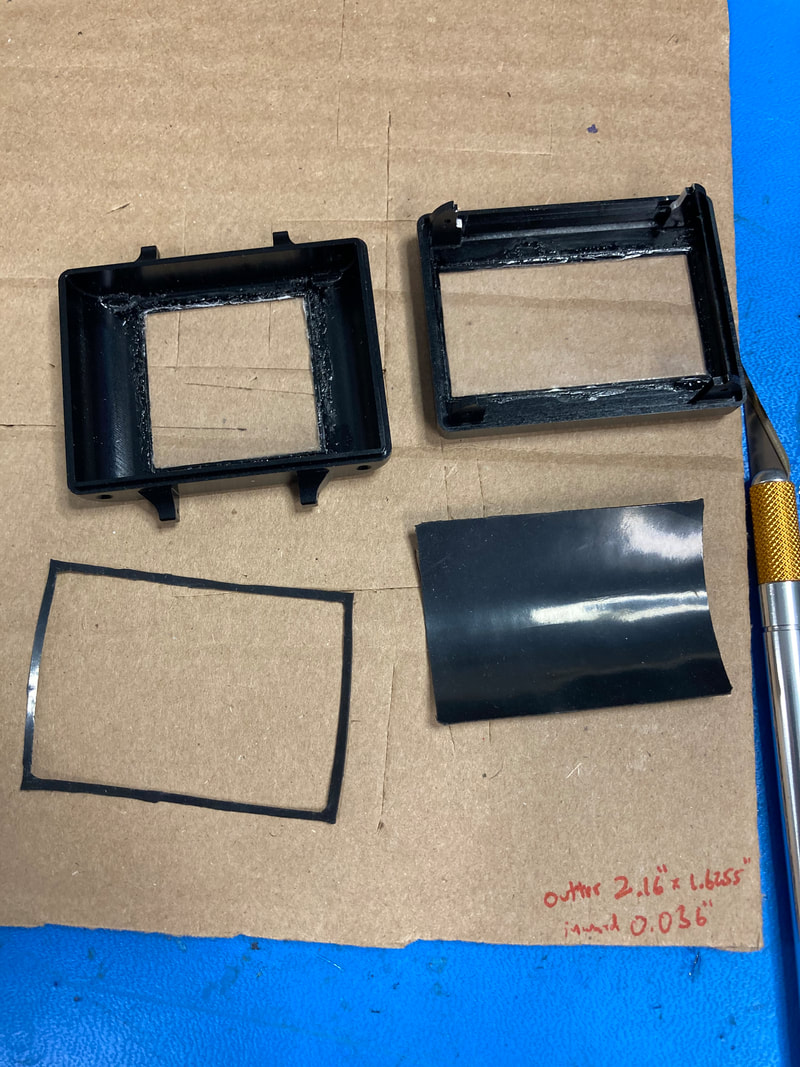
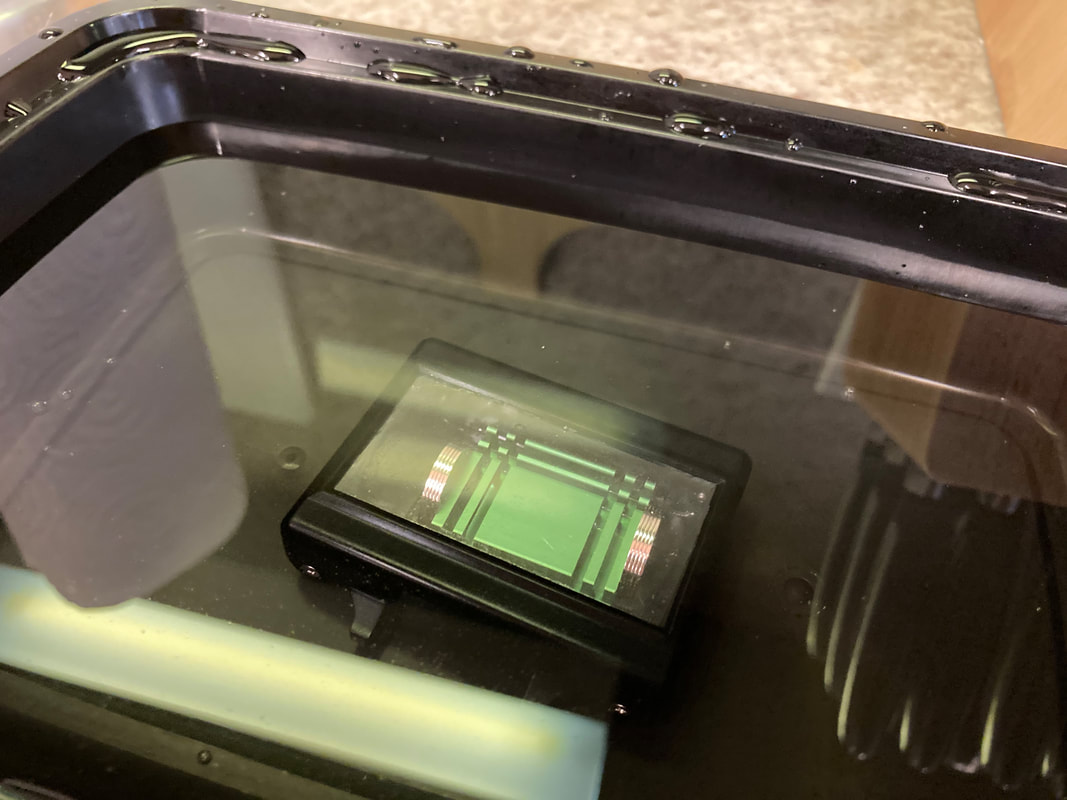
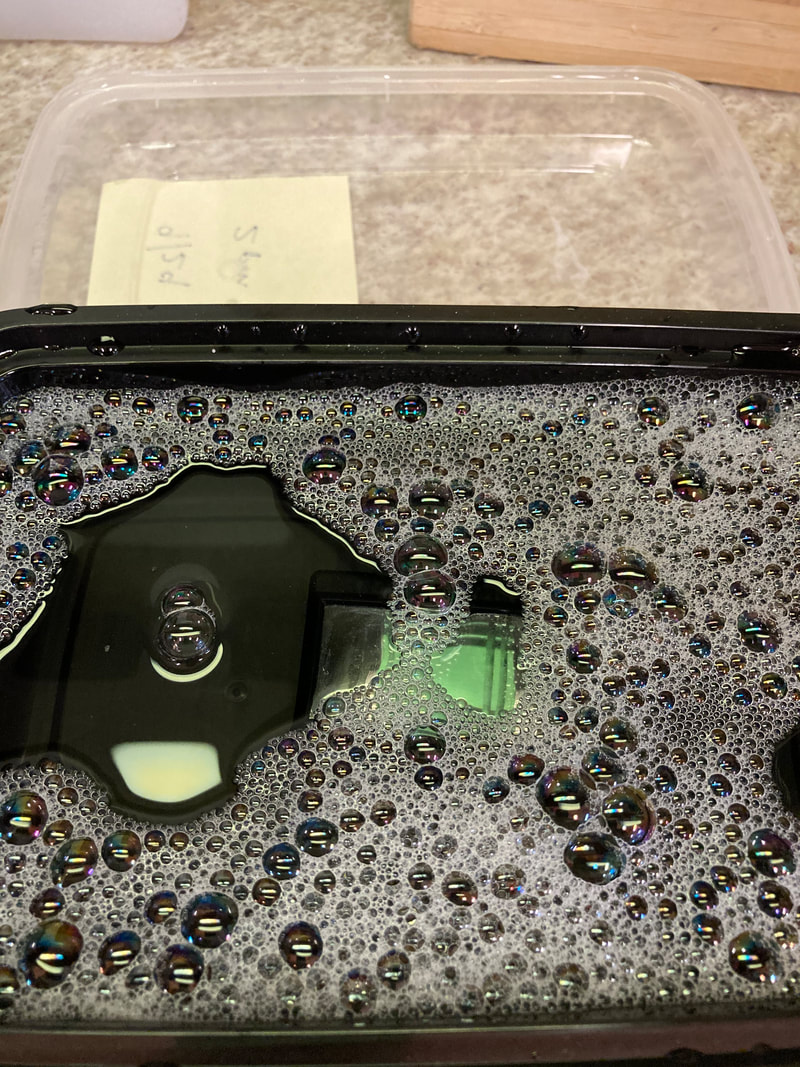
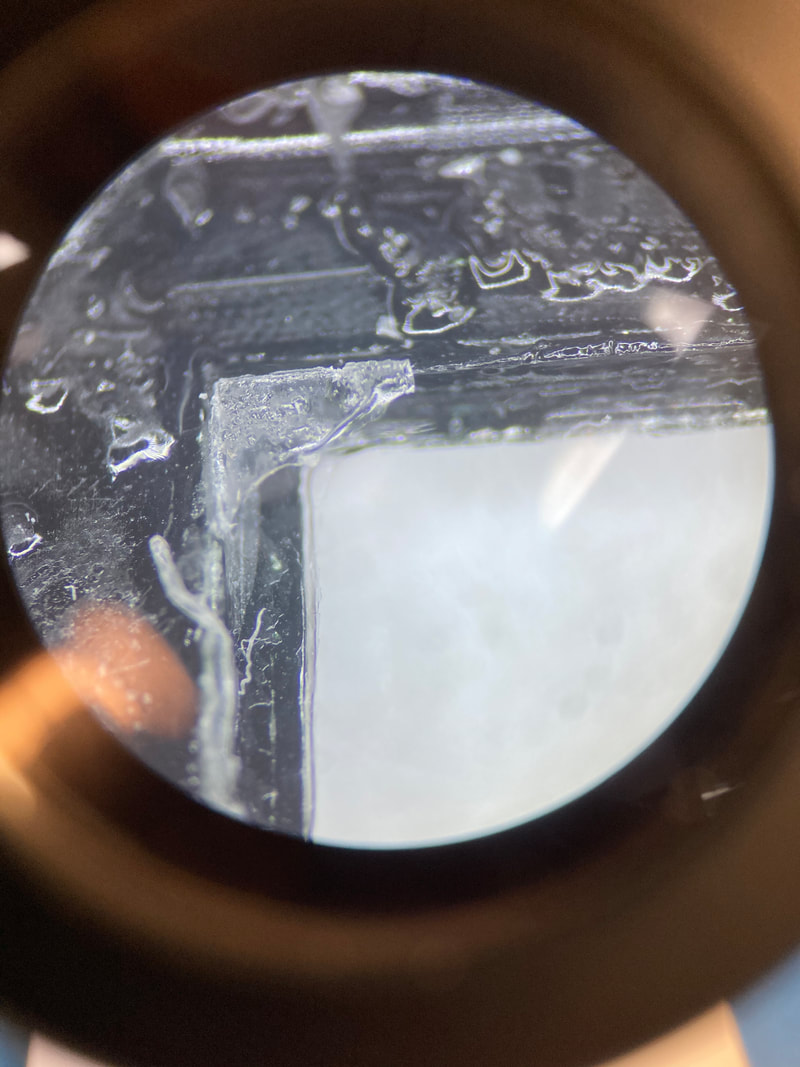
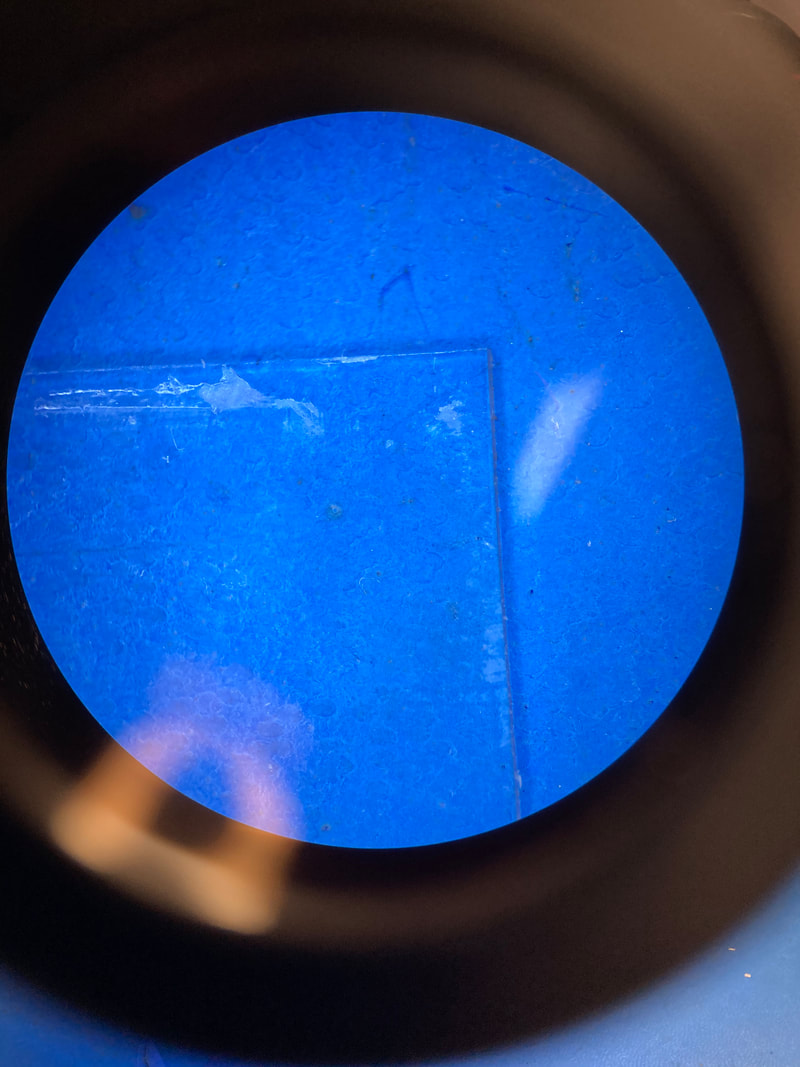
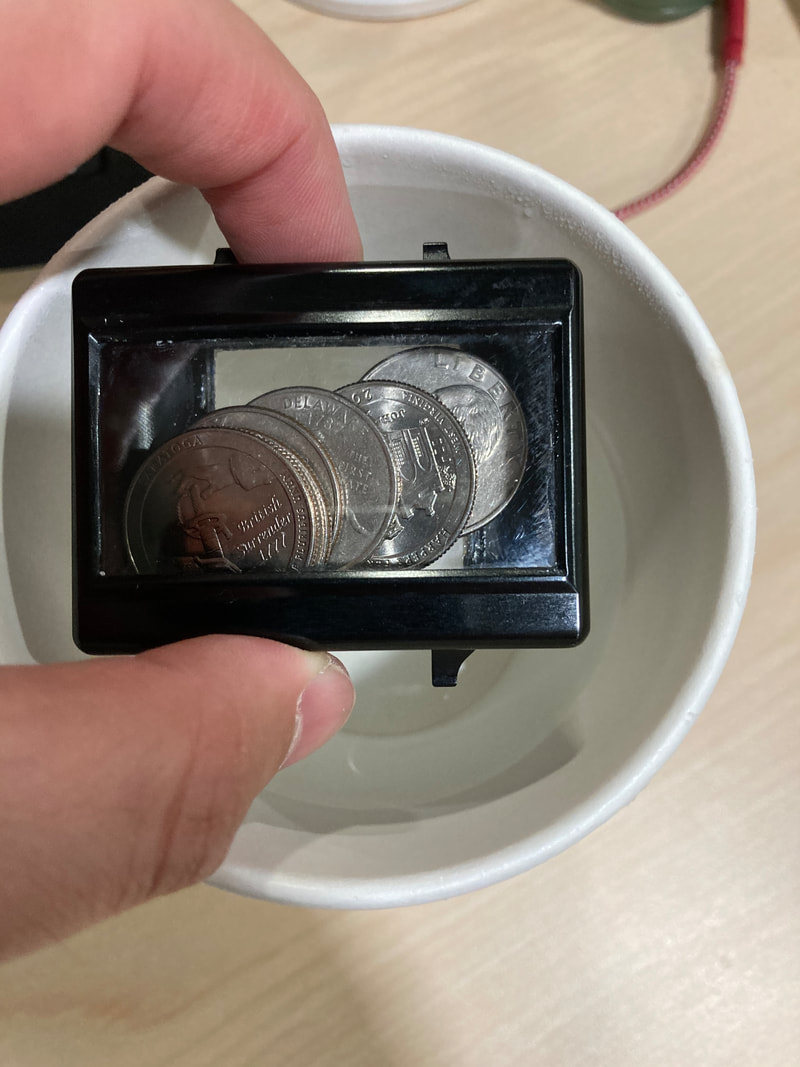
The watch’s cover glass and its bondline with the case was always my biggest worry. Apparently real watches with glass faces have a mechanically pressed in coverglass that crushes a seal around the perimeter to both hold the glass in place as well as protect the inside watch face. Since I’m gluing the glass and metal case together I had to make sure the glue both sealed against water and was a good adhesive for the two materials. Most importantly, the glue had to hold up against water, sweat, and oils since the back window on the watch rests on the wrist. I tried all kinds of “glass glues” and epoxies with the gorilla glass I had bought a while back but absolutely none of them bonded to the glass. It was clear once I dunked the whole thing in water or salt-water (or once even oily water to simulate skin oils) that none of the glues actually etched into the glass. After a week of the watch being in various solutions the water would work its way to the glue and separate it from the glass. You can clearly see under the microscope that the glue was never really bonding to the glass. I finally chose to change to 1/16th inch thick acrylic sheets so I could use super glue to hold it in place. Super glue actually melts the acrylic and fuses to the two materials. After a week of this experiment the acrylic held in salt water! I tried it for an extra week and started to get the acrylic turning into goo inside. I found some rust from the coins I had thrown in to weigh the whole thing down so it may have been that, not sure. Ultimately I think the acrylic is best since it's cheap, easy to laser cut into shape, and glue into place. Even if something goes wrong I imagine I can pop out the original piece, clean up the glue from the case and reapply a new acrylic piece with no problems. So We’re going with the acrylic!
The watch’s cover glass and its bondline with the case was always my biggest worry. Apparently real watches with glass faces have a mechanically pressed in coverglass that crushes a seal around the perimeter to both hold the glass in place as well as protect the inside watch face. Since I’m gluing the glass and metal case together I had to make sure the glue both sealed against water and was a good adhesive for the two materials. Most importantly, the glue had to hold up against water, sweat, and oils since the back window on the watch rests on the wrist. I tried all kinds of “glass glues” and epoxies with the gorilla glass I had bought a while back but absolutely none of them bonded to the glass. It was clear once I dunked the whole thing in water or salt-water (or once even oily water to simulate skin oils) that none of the glues actually etched into the glass. After a week of the watch being in various solutions the water would work its way to the glue and separate it from the glass. You can clearly see under the microscope that the glue was never really bonding to the glass. I finally chose to change to 1/16th inch thick acrylic sheets so I could use super glue to hold it in place. Super glue actually melts the acrylic and fuses to the two materials. After a week of this experiment the acrylic held in salt water! I tried it for an extra week and started to get the acrylic turning into goo inside. I found some rust from the coins I had thrown in to weigh the whole thing down so it may have been that, not sure. Ultimately I think the acrylic is best since it's cheap, easy to laser cut into shape, and glue into place. Even if something goes wrong I imagine I can pop out the original piece, clean up the glue from the case and reapply a new acrylic piece with no problems. So We’re going with the acrylic!
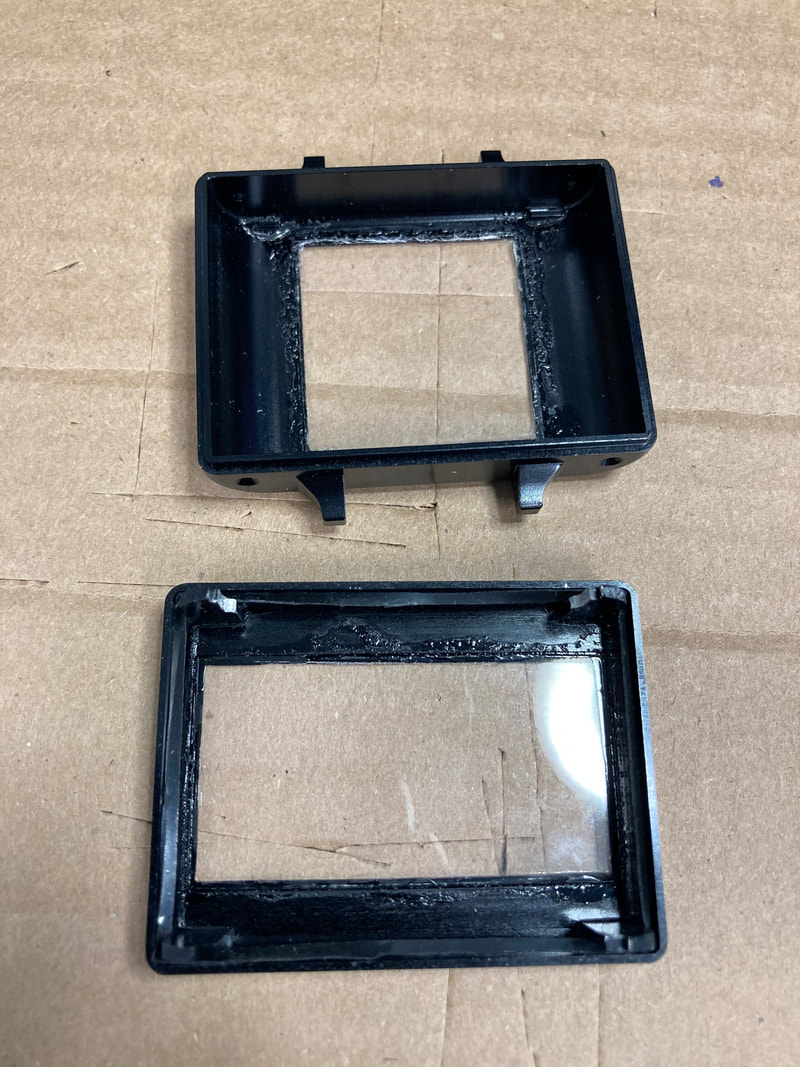
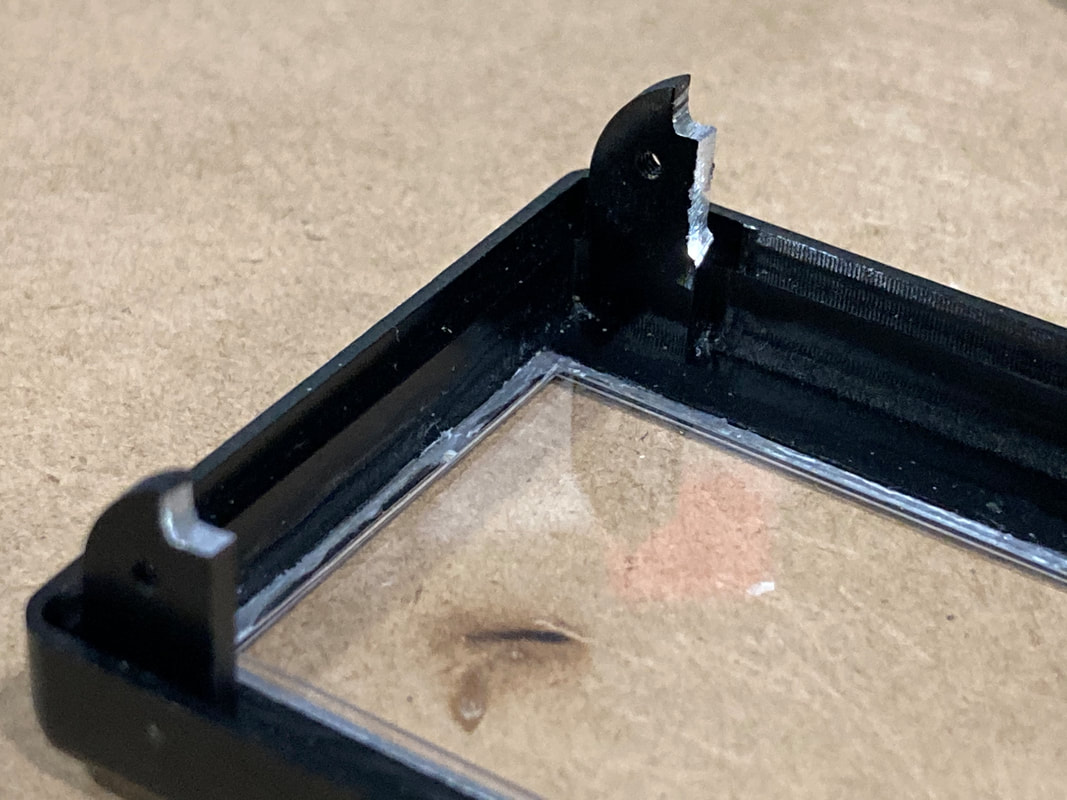
Gluing Acrylic
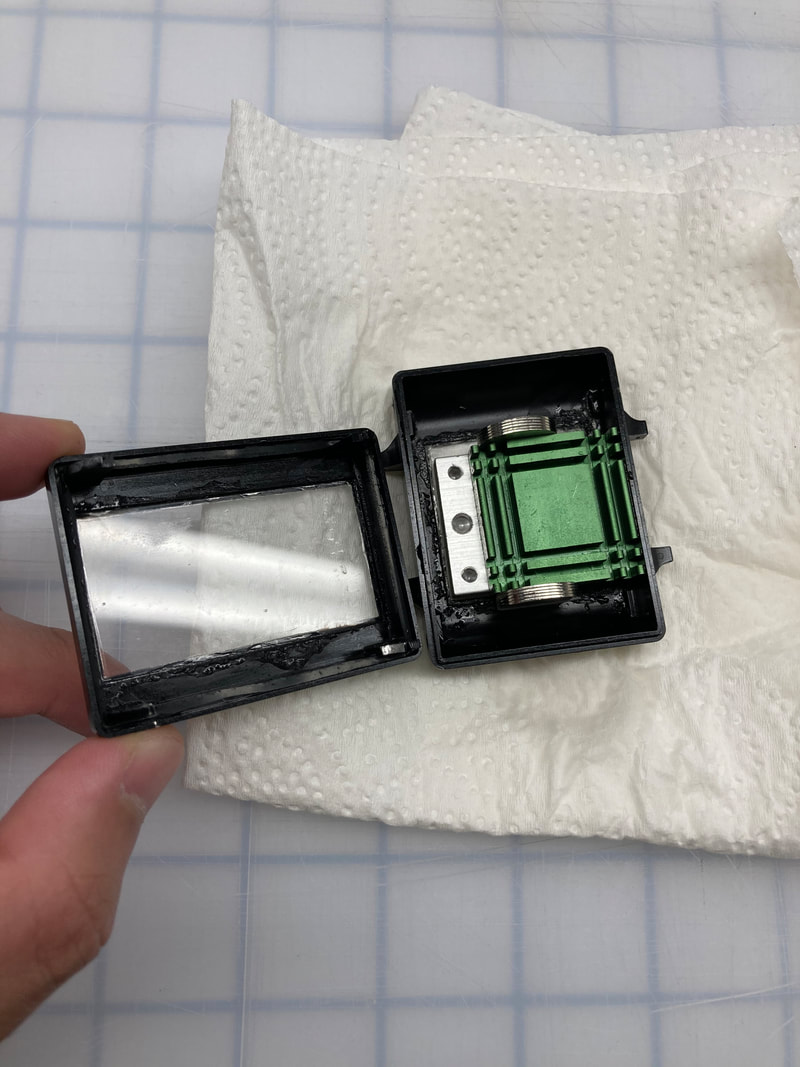
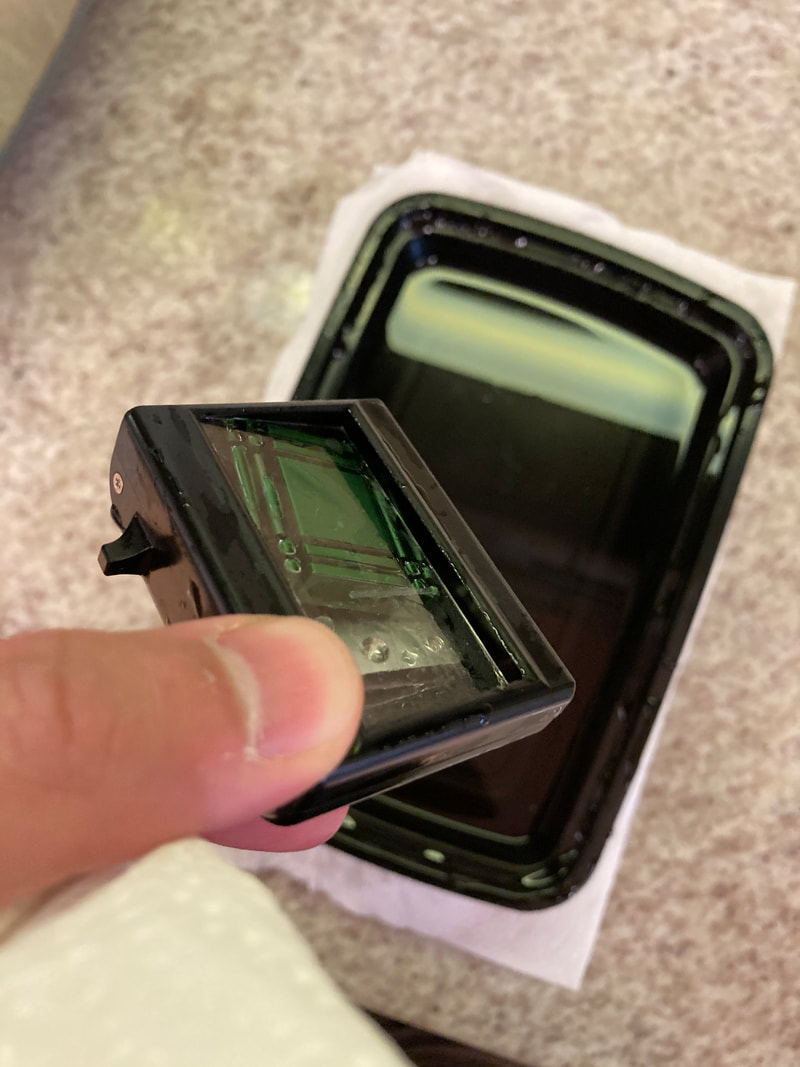
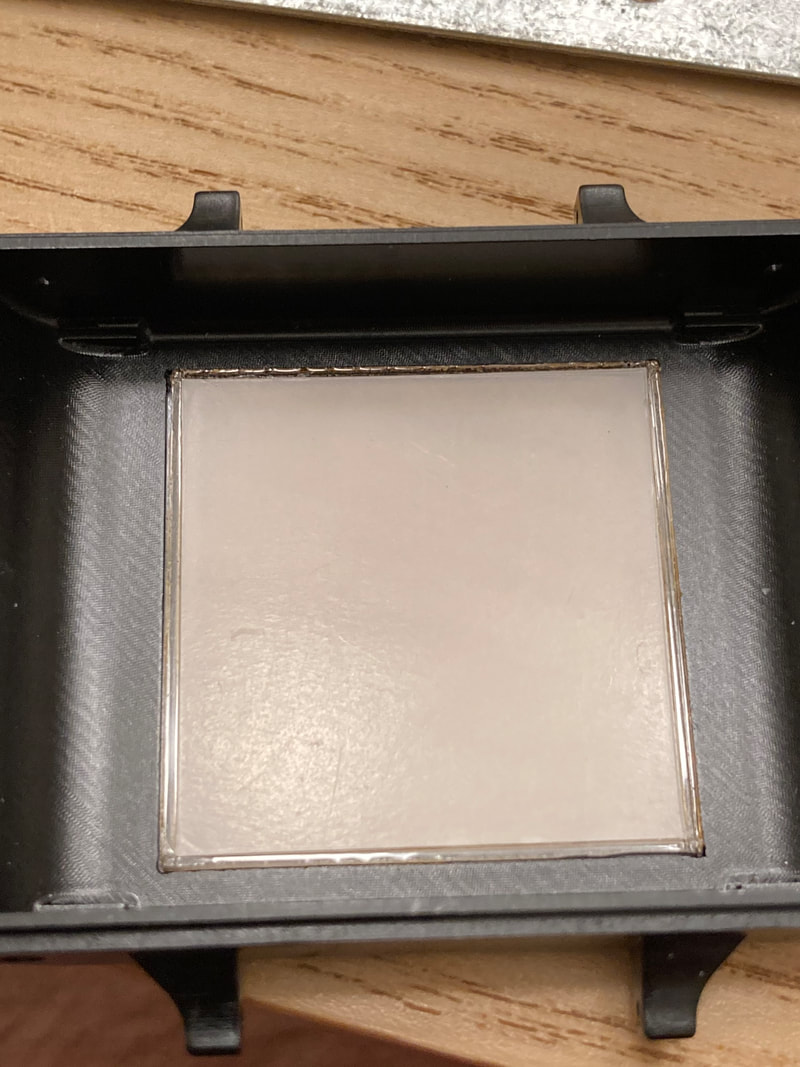
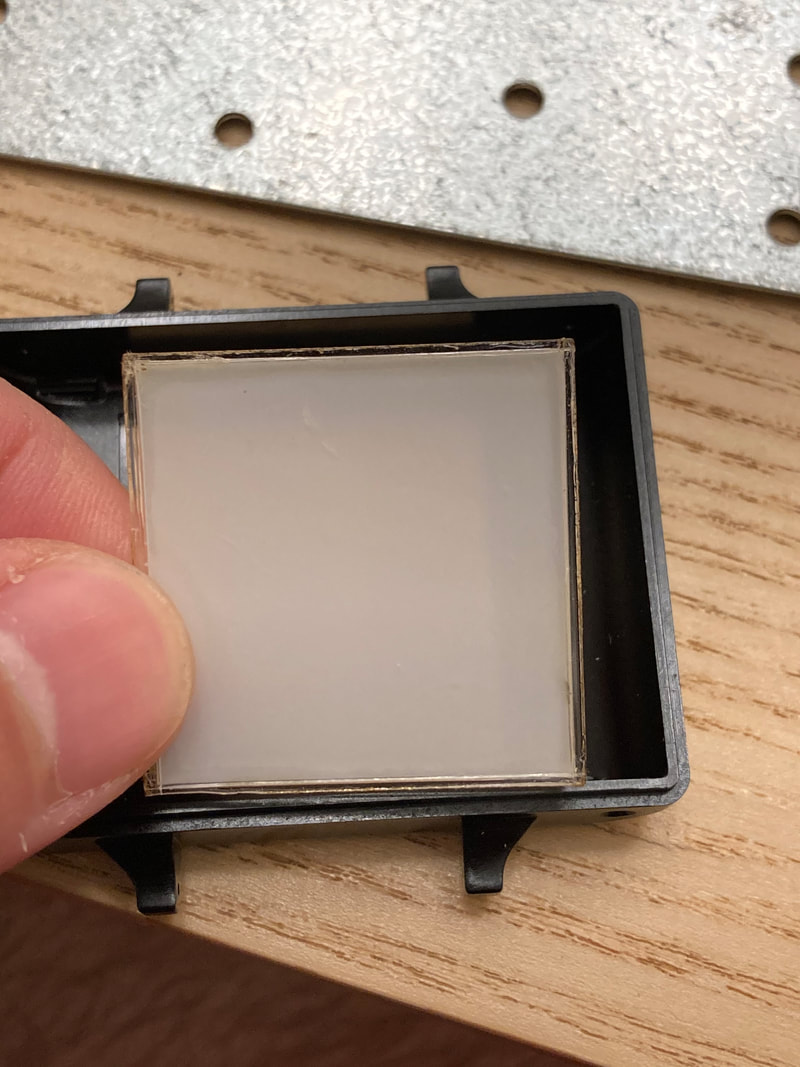
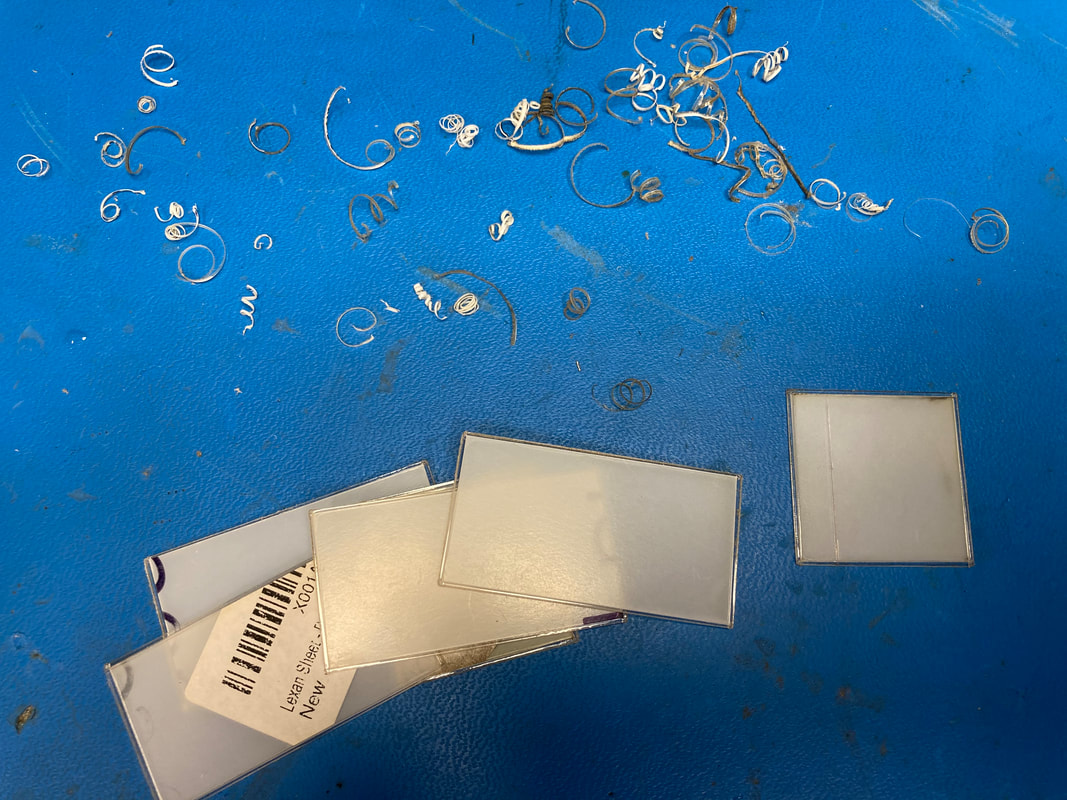
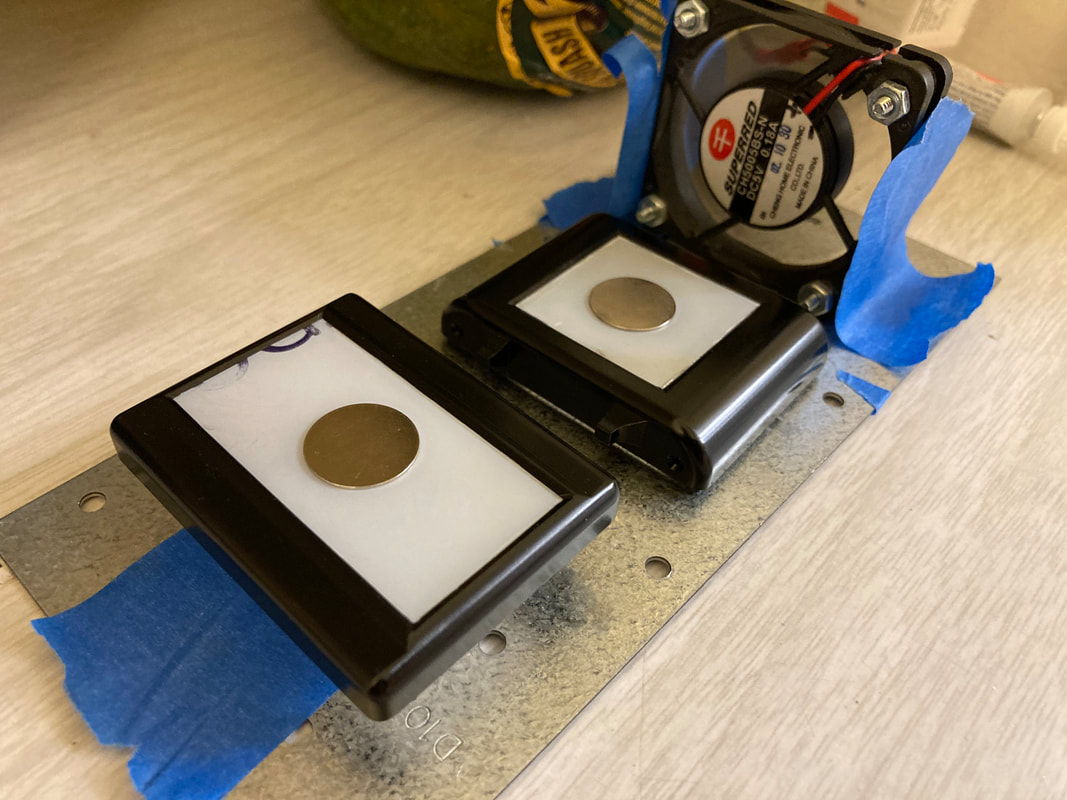
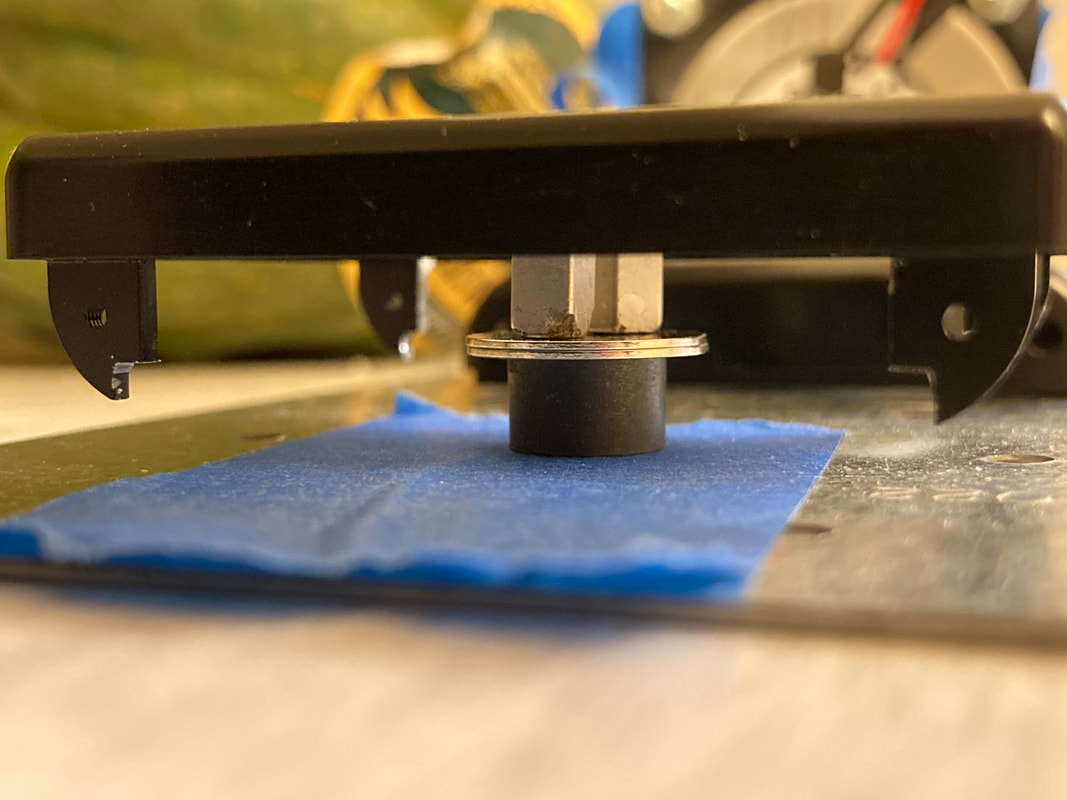
The one thing you gotta worry about with super glue and large pieces of plastic is that as the glue dries, its fumes condense on the acrylic and basically etch into the material. I also saw that if I glued the acrylic to a piece and left it to dry in a corner the acrylic would etch away a tiny bit at the black oxide layer of the metal case changing its color slightly. To mitigate these problems I did two things: 1) when I laser cut the acrylic windows into shape, I would leave the covering on. Once the piece was cut, I’d clean up the edges then cut a sliver of the coverings on both sides off the perimeter. This way the glue bonds directly to the acrylic as opposed to the protective covering but once the glue has dried the covering can be taken off to reveal a pristine window. 2) I glued everything while the acrylic and case were held in place by magnets just above a small piece of sheet metal. I then put a computer fan on one end to continually circulate air so the toxic fumes don’t stay in one place and mess up the materials. By the end I think I got a great way to produce these puppies!
The one thing you gotta worry about with super glue and large pieces of plastic is that as the glue dries, its fumes condense on the acrylic and basically etch into the material. I also saw that if I glued the acrylic to a piece and left it to dry in a corner the acrylic would etch away a tiny bit at the black oxide layer of the metal case changing its color slightly. To mitigate these problems I did two things: 1) when I laser cut the acrylic windows into shape, I would leave the covering on. Once the piece was cut, I’d clean up the edges then cut a sliver of the coverings on both sides off the perimeter. This way the glue bonds directly to the acrylic as opposed to the protective covering but once the glue has dried the covering can be taken off to reveal a pristine window. 2) I glued everything while the acrylic and case were held in place by magnets just above a small piece of sheet metal. I then put a computer fan on one end to continually circulate air so the toxic fumes don’t stay in one place and mess up the materials. By the end I think I got a great way to produce these puppies!
Misfire on Tubes (dark room vs light room)
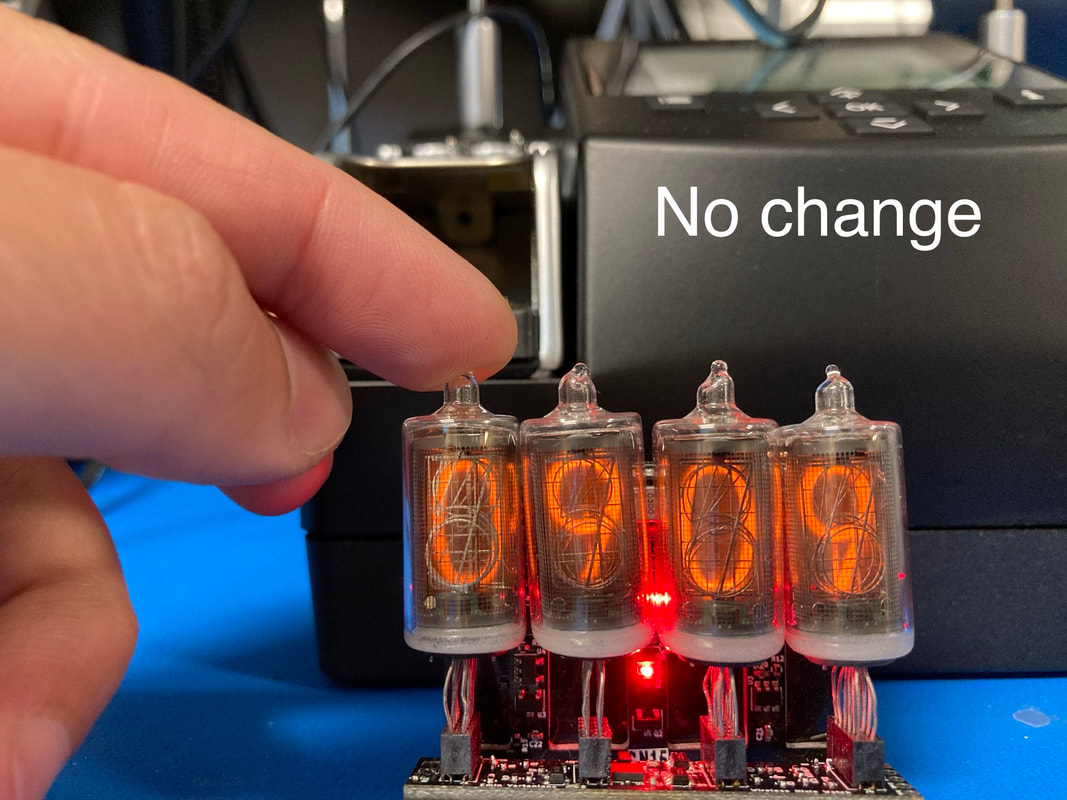
I am sometimes seeing one or two of the tubes not immediately come on when the watch tries to light them. Like the watch will try to say 12:34 but the “4” will be dark for 100ms before finally catching up to the others and lighting. I figured this might be because of my transistors and how fast they turn on and off since I’m muxing the digits but my scope shots showed that both the anode and cathode transistors were turning on and off just fine and that sometimes the tube just had 180v across it for 100’s of milliseconds and it just wouldn’t do anything. Then I stumbled upon Farny Labs who is making new Nixie tubes and watched their video explaining how they tried to get a nixie clock to run at 100khz (embedded at the end of this blog post). The theory of operation inside the tube is really cool and I recommend anyone interested in Nixies to watch it, but after some research and brainstorming I reckon that my tubes aren't lighting because the gas inside hasn’t had time to ionize just yet. I even inadvertently proved this to myself by lighting the tubes it a dark room vs a lit room. Whereas the tubes would take anywhere between 0.8 to 30ms to actually light up in a lit room, when the room was dark I saw times between 80 and 1500ms! A single tube took 1.5 seconds of 180v across it to ionize its gases when it had been sitting in a completely dark room for 30 seconds. The fact that photons from the room lights could pre-excite the gas in the nixie tube such that I’m seeing a 10x difference between lighting times is amazing! I tried a few ways of fixing this so the user doesn’t have to deal with it but nothing was “satisfying”. In nixie desk clocks I believe the 180v regulator is always on and keeps all the cathodes at like 100v so the gases are always ionized and ready to light. I’ll consider this problem a cool quirk of the nixie that people can learn about and be excited to carry on their wrist.
I am sometimes seeing one or two of the tubes not immediately come on when the watch tries to light them. Like the watch will try to say 12:34 but the “4” will be dark for 100ms before finally catching up to the others and lighting. I figured this might be because of my transistors and how fast they turn on and off since I’m muxing the digits but my scope shots showed that both the anode and cathode transistors were turning on and off just fine and that sometimes the tube just had 180v across it for 100’s of milliseconds and it just wouldn’t do anything. Then I stumbled upon Farny Labs who is making new Nixie tubes and watched their video explaining how they tried to get a nixie clock to run at 100khz (embedded at the end of this blog post). The theory of operation inside the tube is really cool and I recommend anyone interested in Nixies to watch it, but after some research and brainstorming I reckon that my tubes aren't lighting because the gas inside hasn’t had time to ionize just yet. I even inadvertently proved this to myself by lighting the tubes it a dark room vs a lit room. Whereas the tubes would take anywhere between 0.8 to 30ms to actually light up in a lit room, when the room was dark I saw times between 80 and 1500ms! A single tube took 1.5 seconds of 180v across it to ionize its gases when it had been sitting in a completely dark room for 30 seconds. The fact that photons from the room lights could pre-excite the gas in the nixie tube such that I’m seeing a 10x difference between lighting times is amazing! I tried a few ways of fixing this so the user doesn’t have to deal with it but nothing was “satisfying”. In nixie desk clocks I believe the 180v regulator is always on and keeps all the cathodes at like 100v so the gases are always ionized and ready to light. I’ll consider this problem a cool quirk of the nixie that people can learn about and be excited to carry on their wrist.
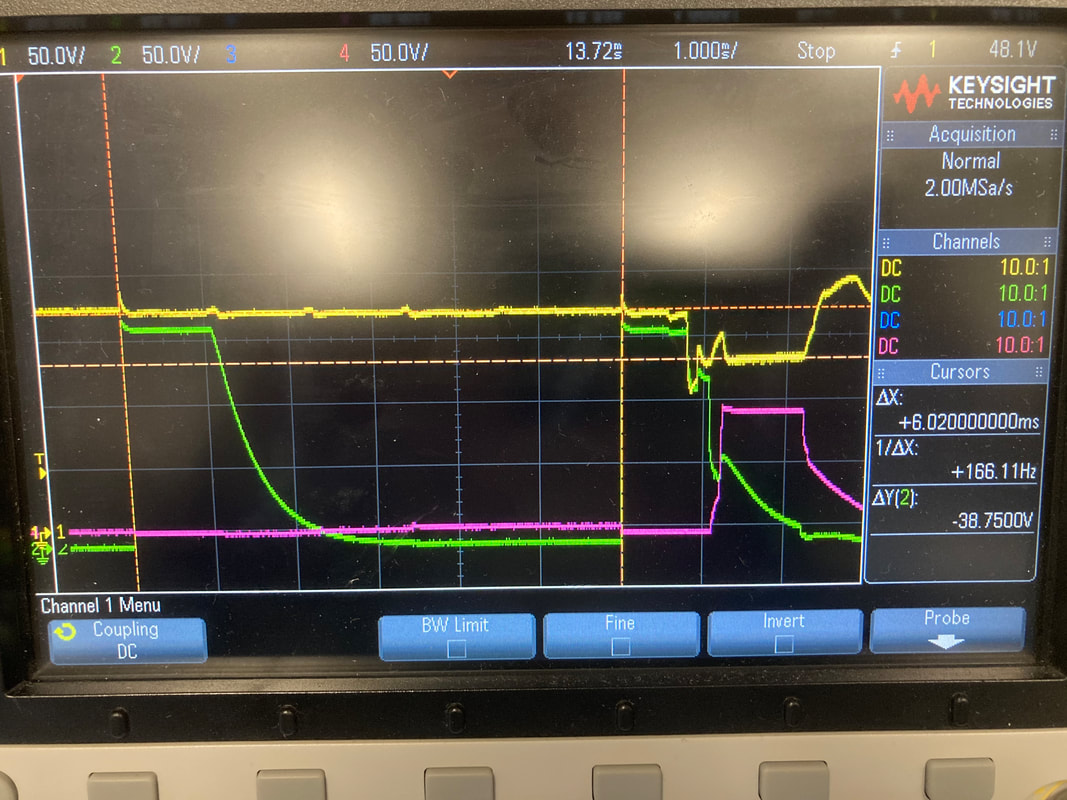
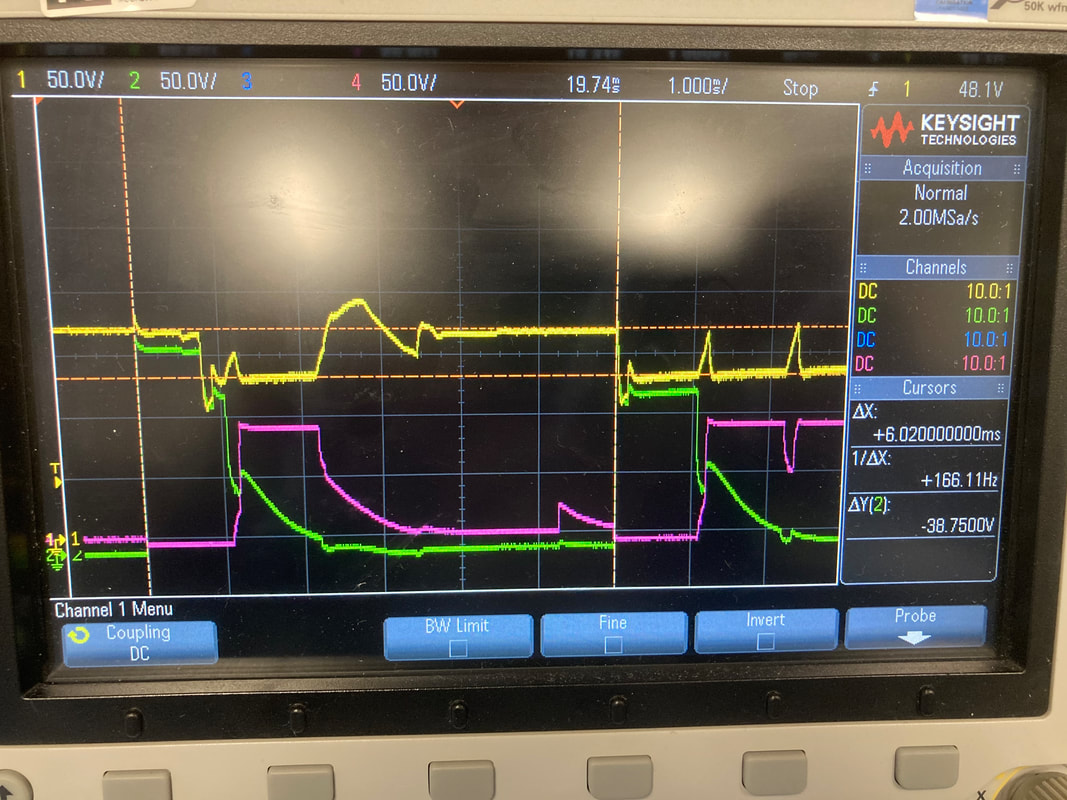
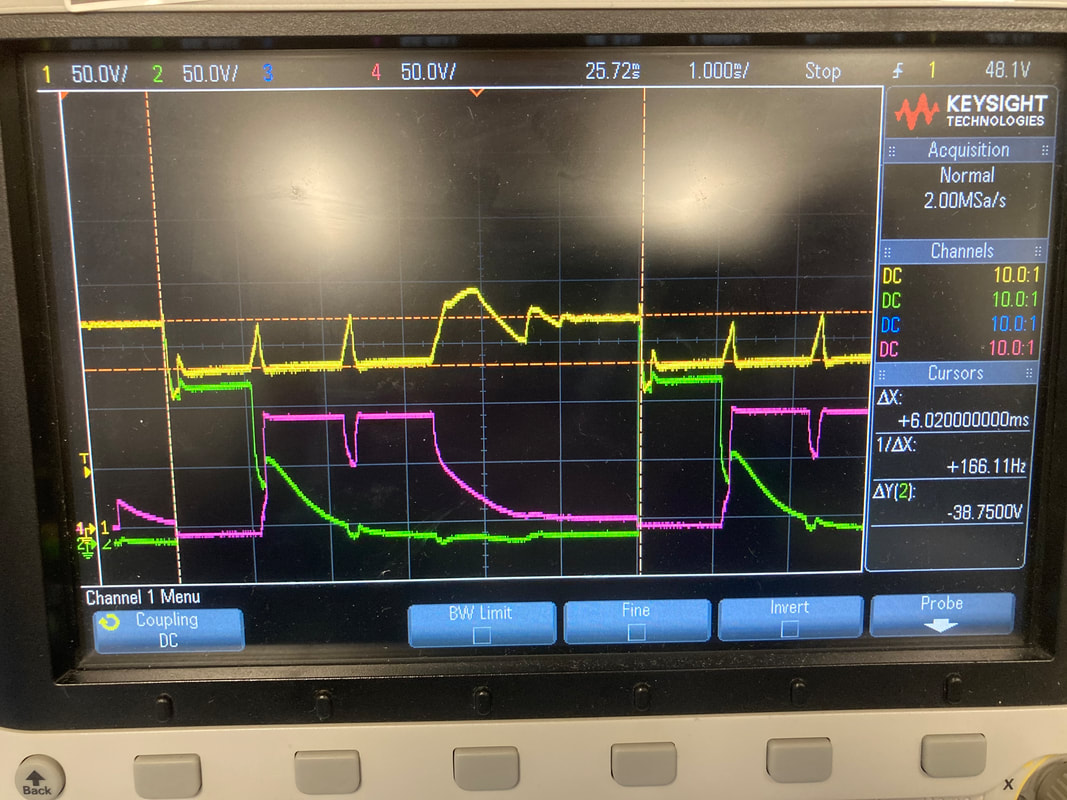
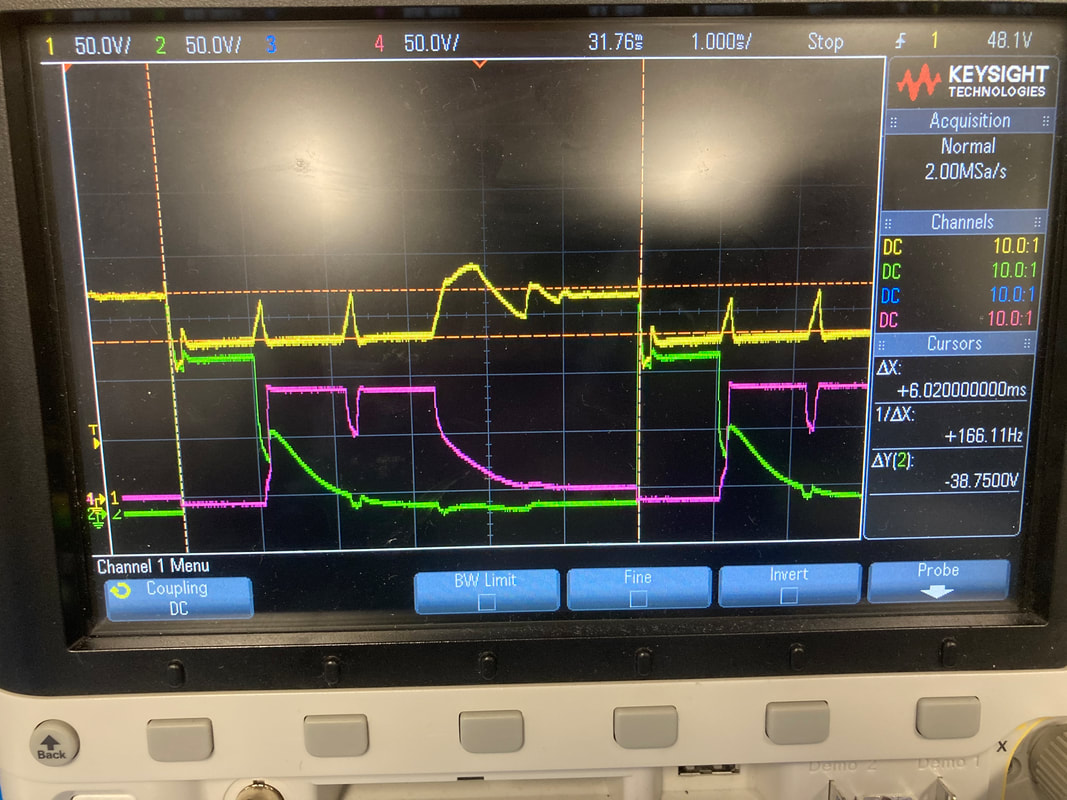
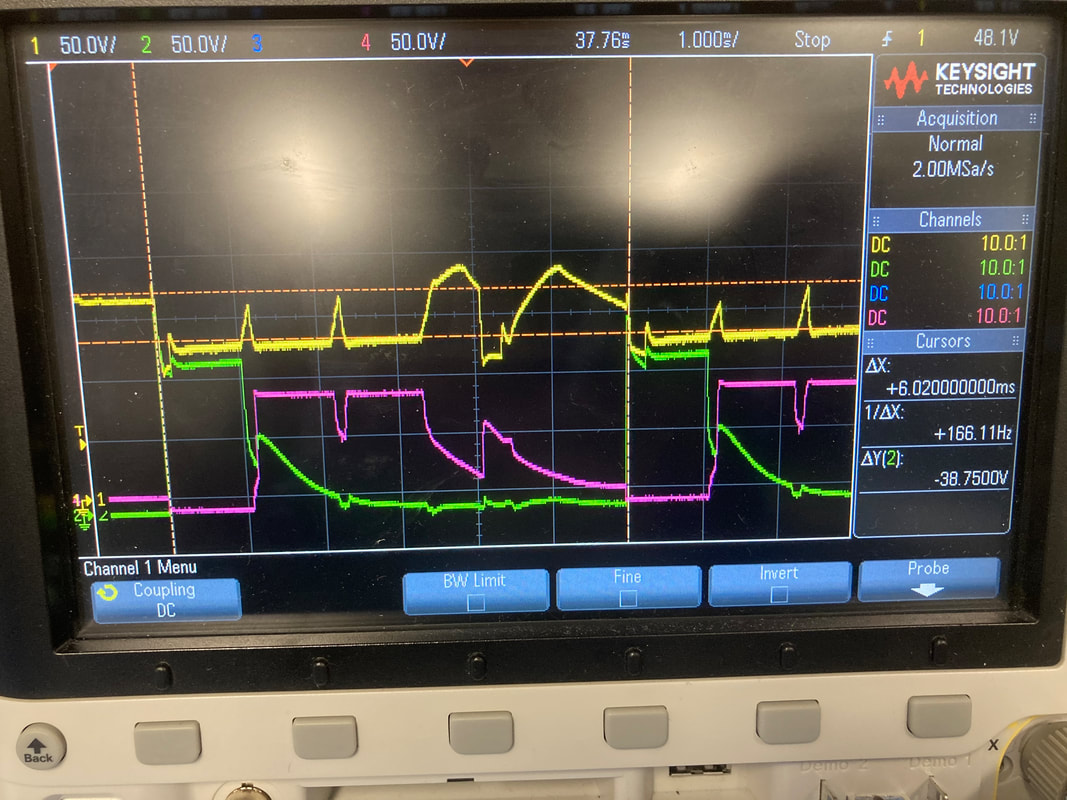
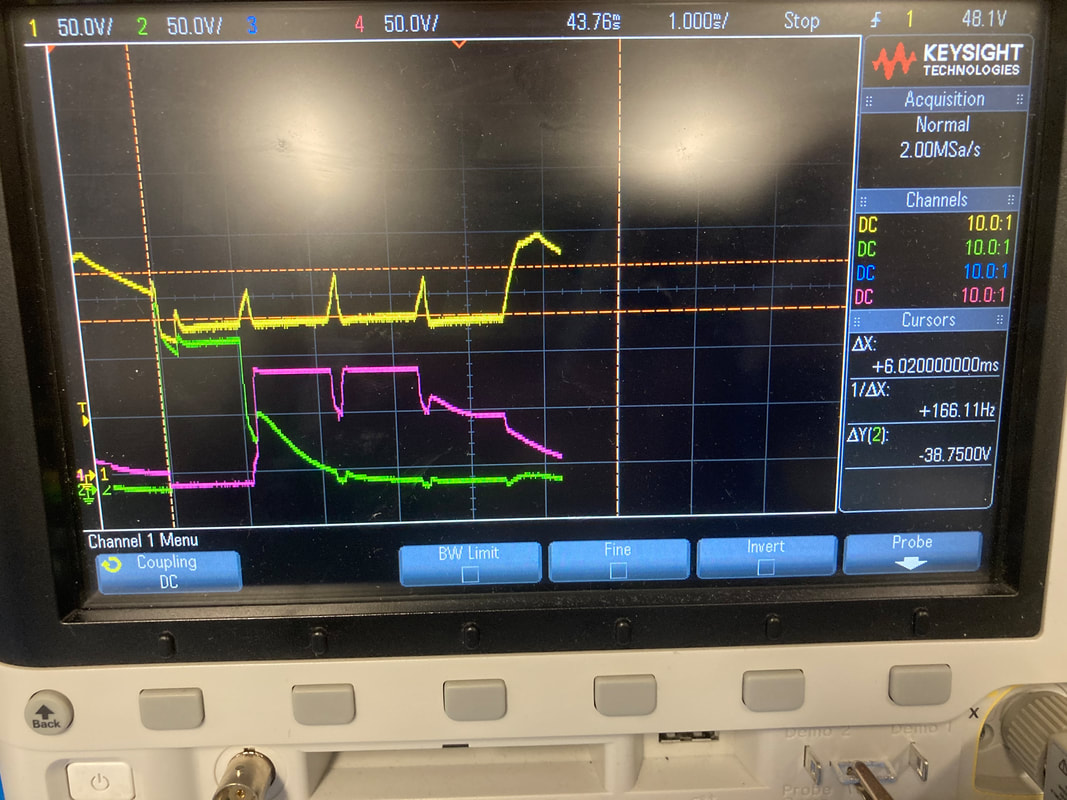
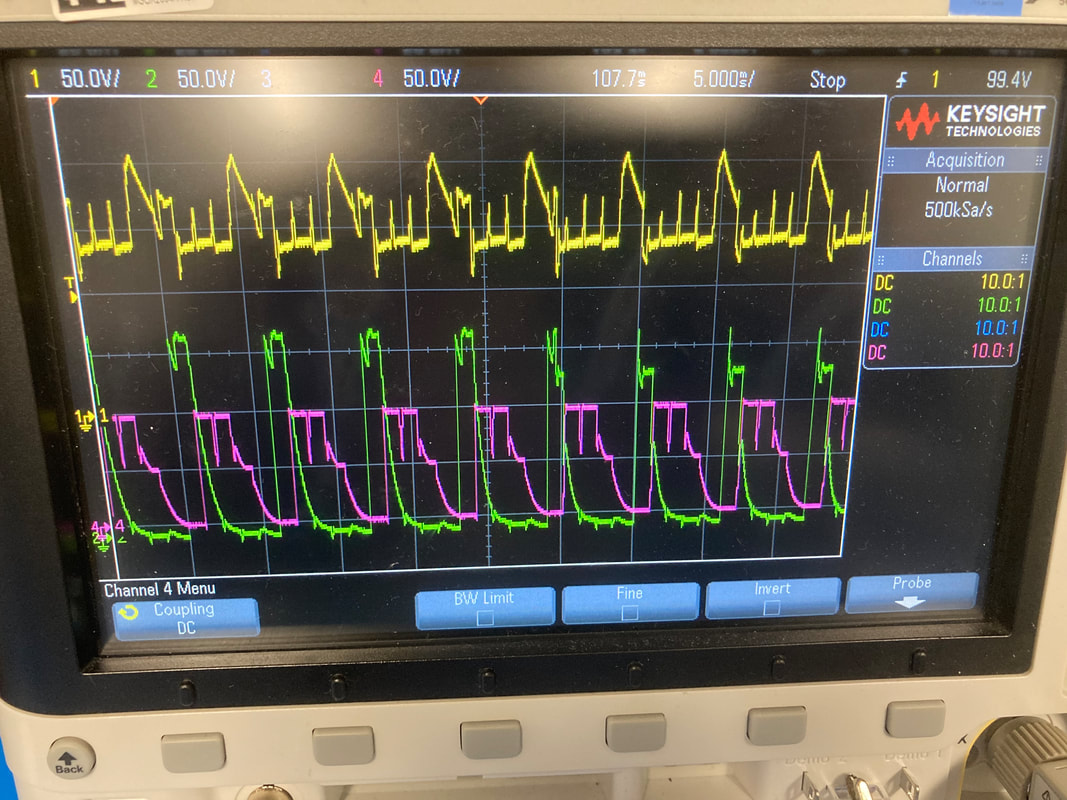
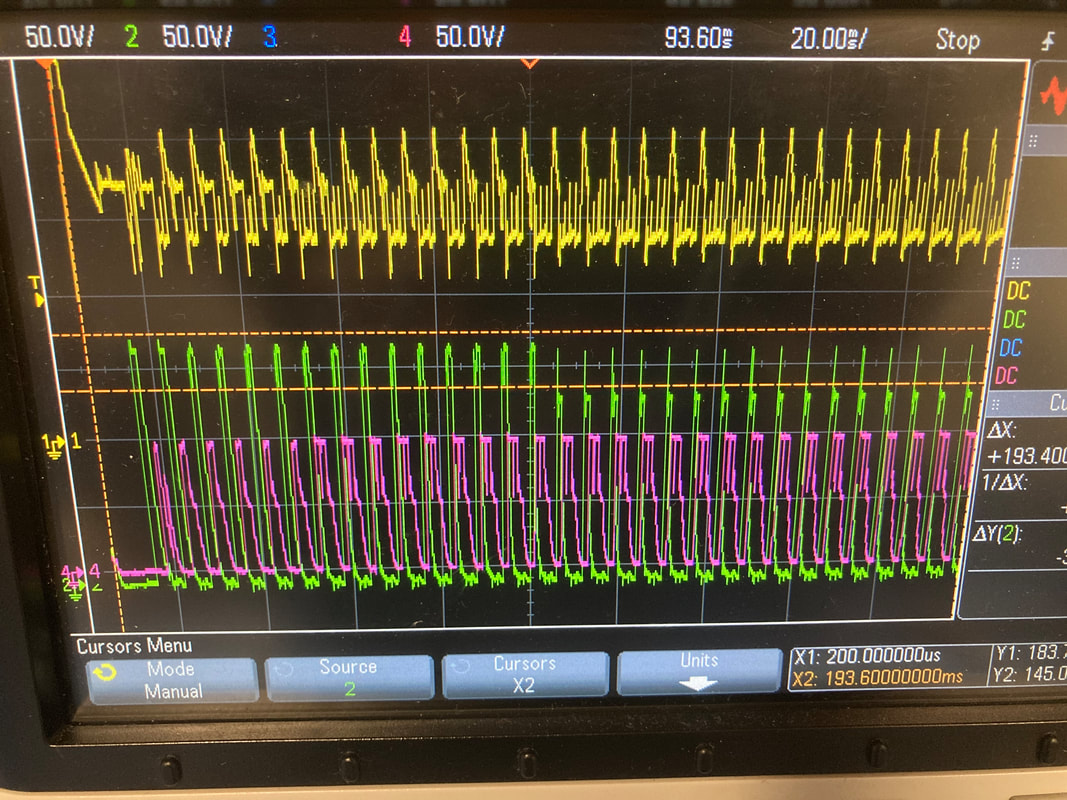
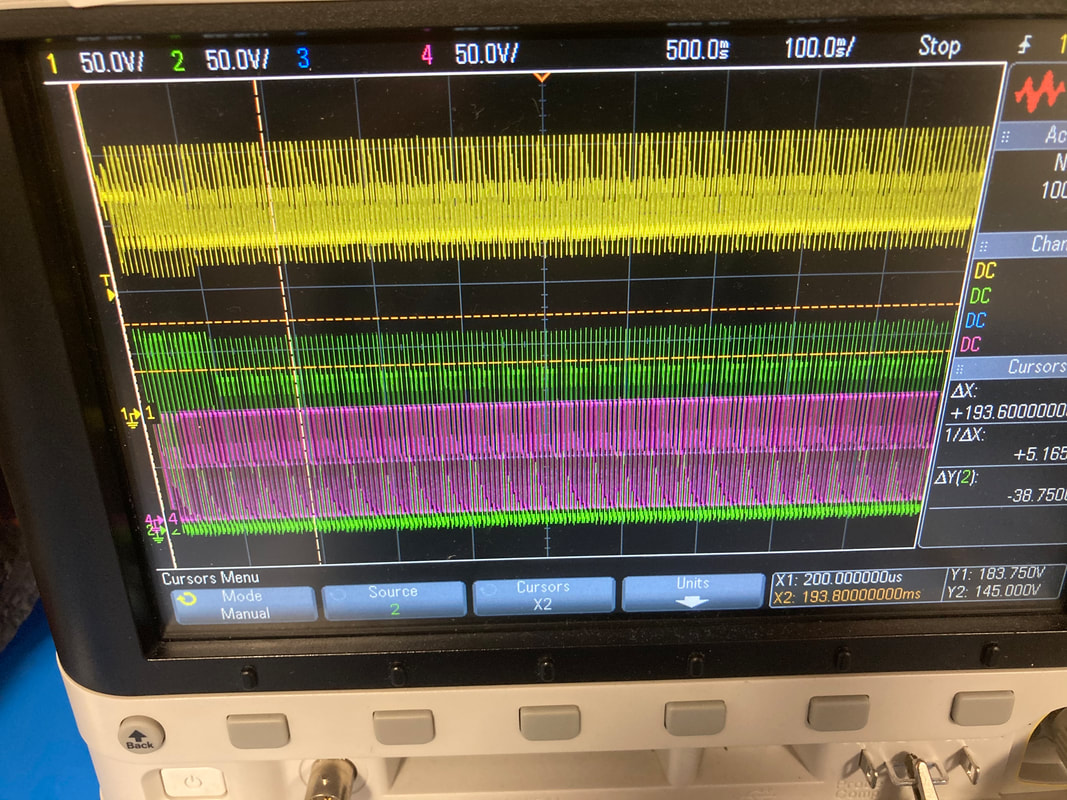
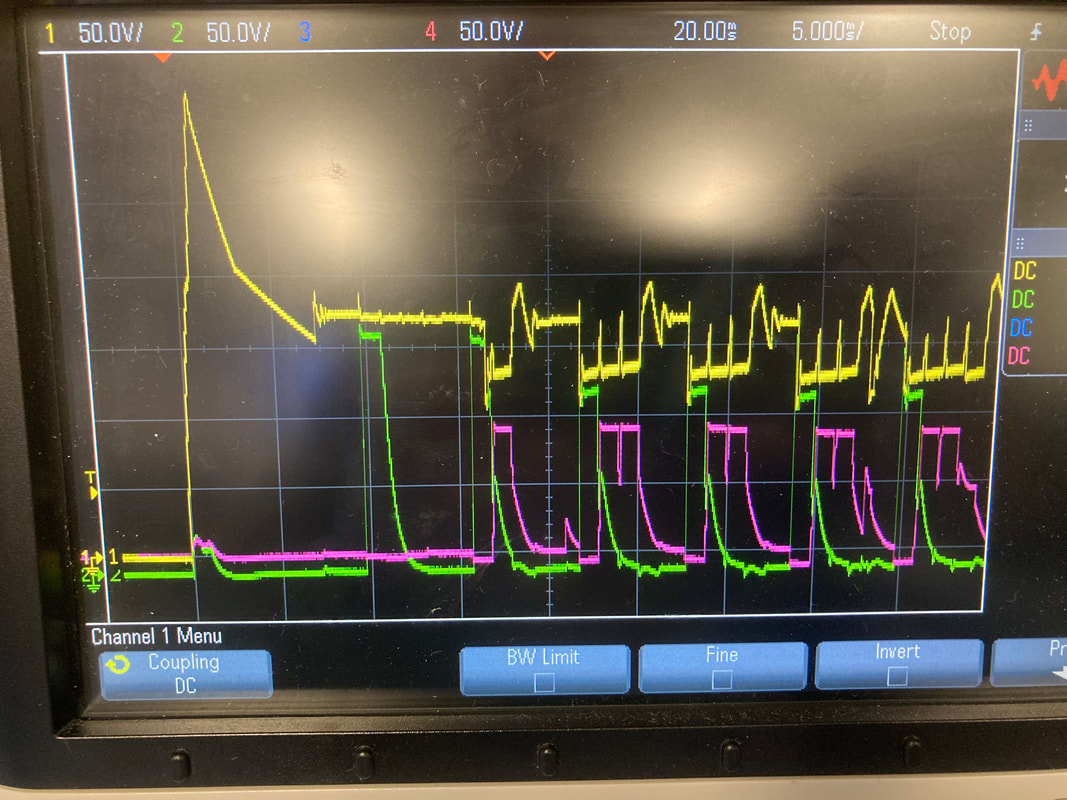 | In the scope plots below you can see the 180v supply (yellow), Tube 1’s Anode pin (Green), and Tube 1’s digit “6” (purple). The one to the left is the full shot, the 6 segments below are each time the code cycles around the 4 tubes. |
Tube Lighting Differences
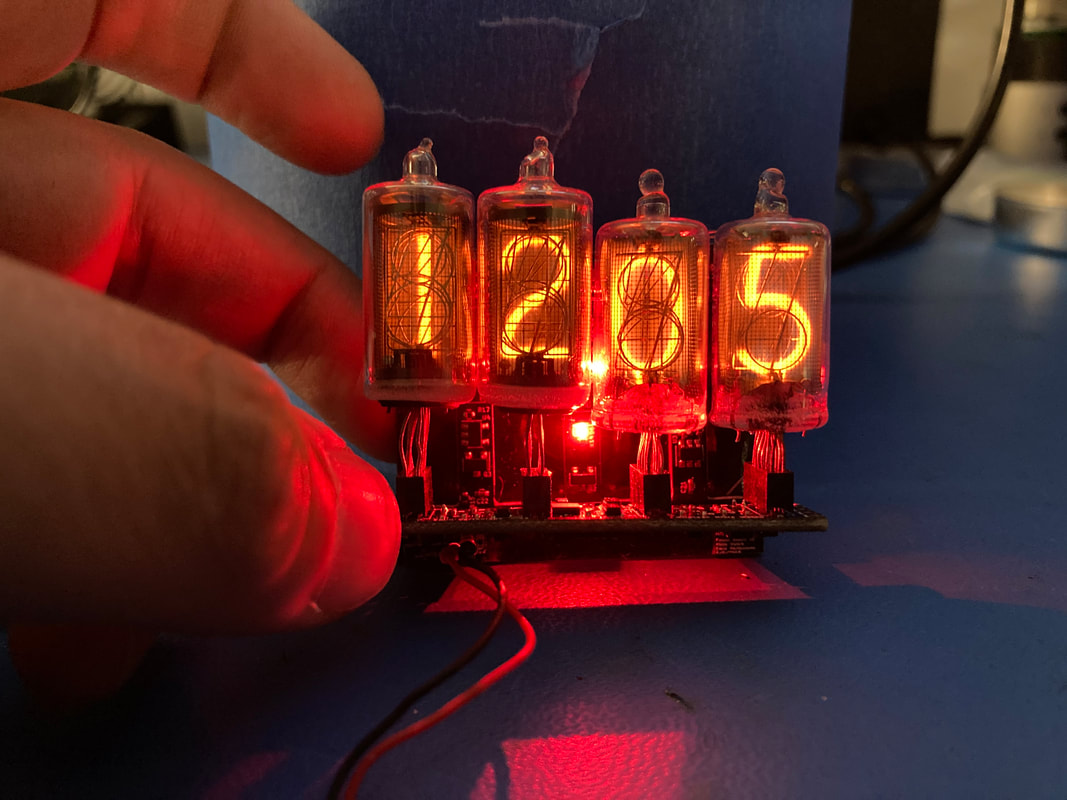
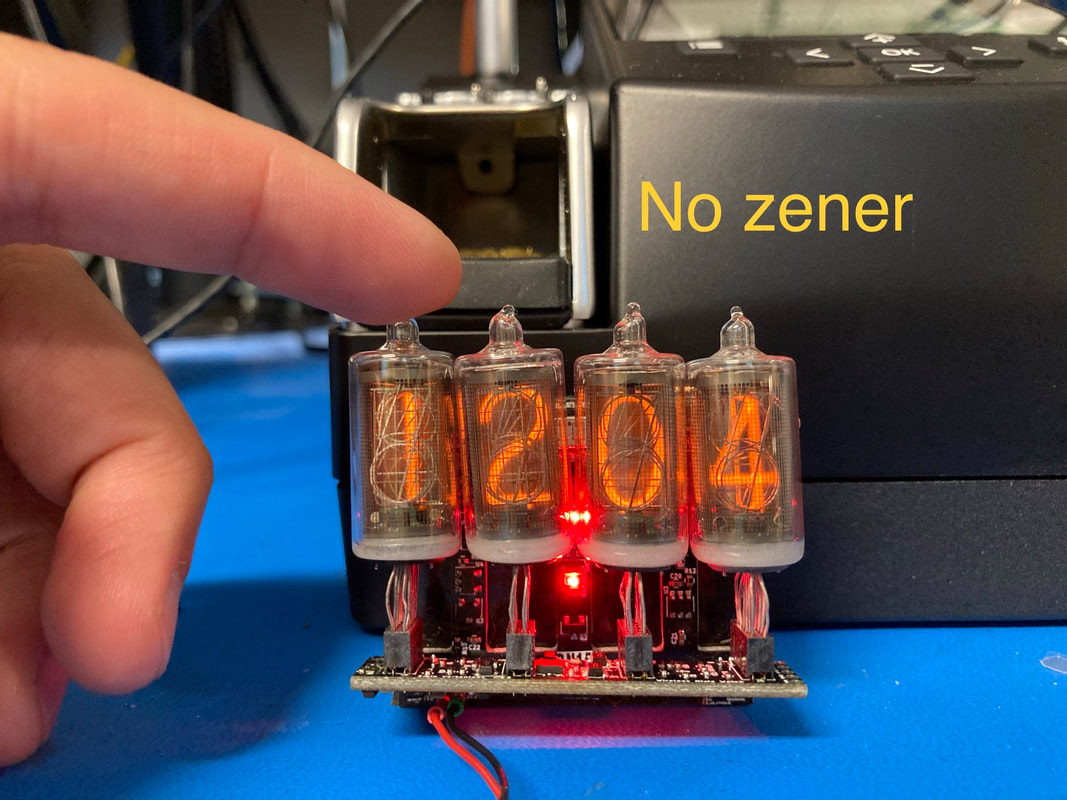
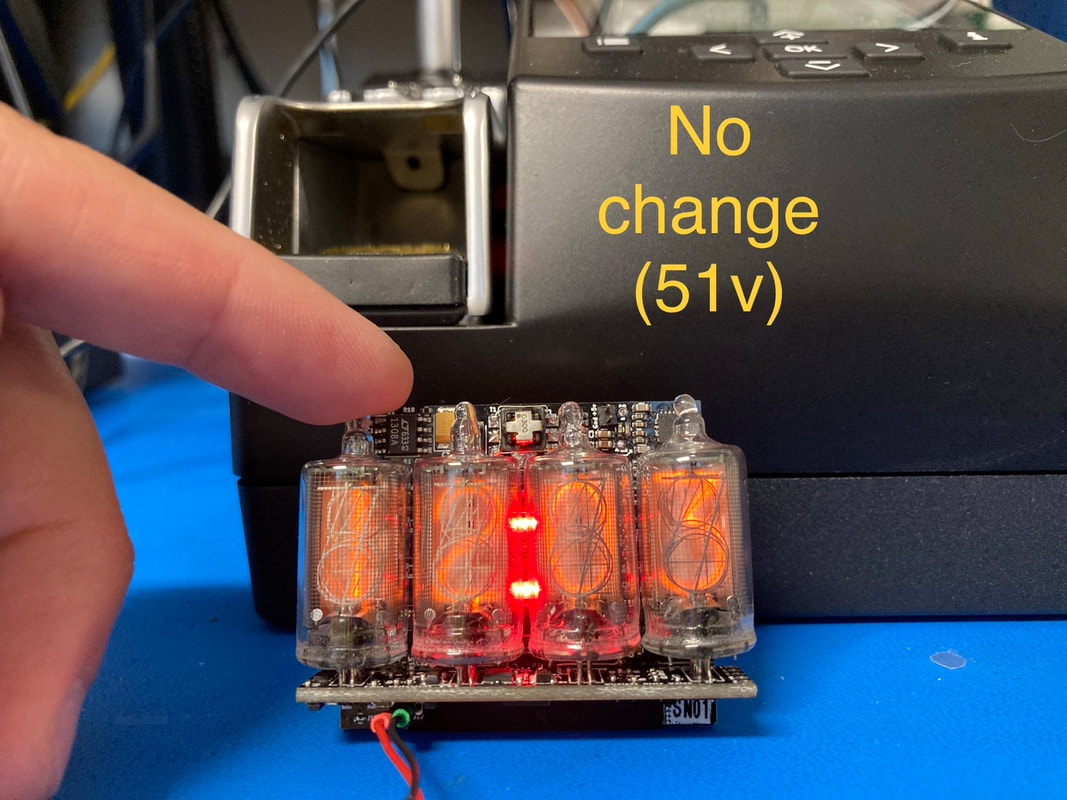
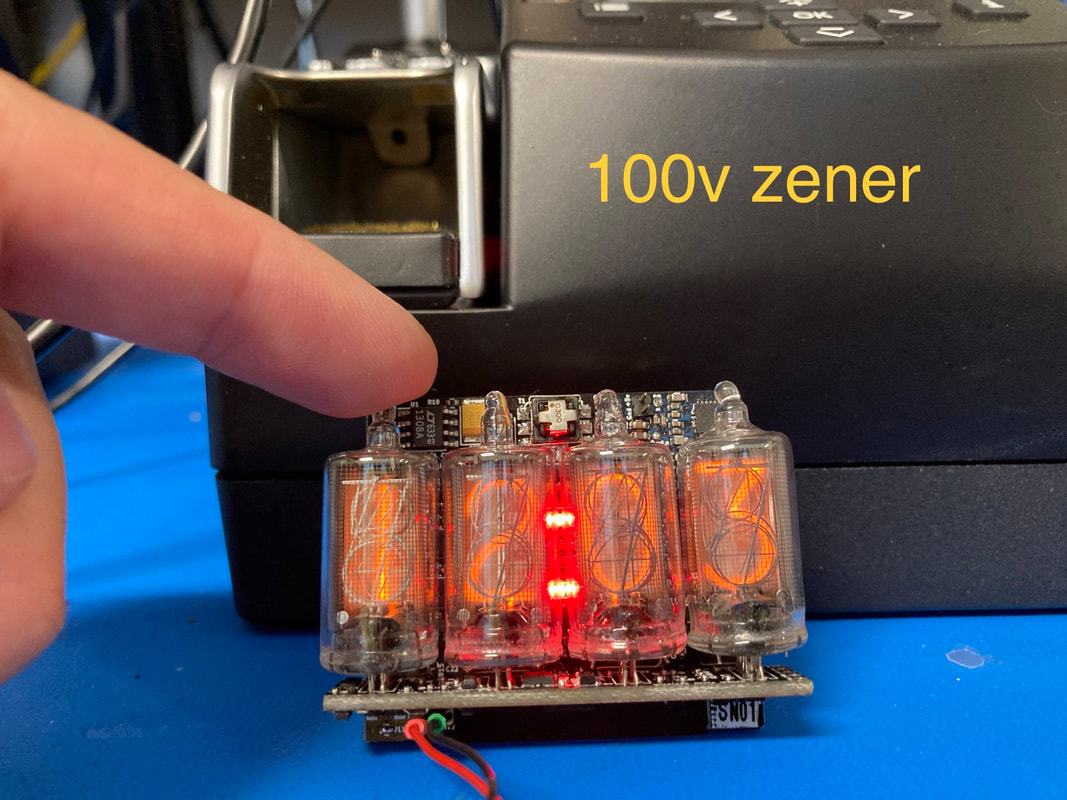
I bought a bunch of different tube variations back when I loaded up on nixies to make a small batch. What I didn’t realize is that even though I’m getting the same 5870 model there seems to be two distinct variations of it. One is darker and seems to have a dark background and a rubber base and generally looks like the nixie tube equivalent of wearing eyeliner, while the other one is lighter, seems much more transparent, and is all glass at the bottom. The dark tubes have more contrast than the light tubes which surprised me. I even tried to change up the zener diode value but no change. It's innate to the tube.I think it’s all good either way but I was surprised to find the same model number can seem so different.
I bought a bunch of different tube variations back when I loaded up on nixies to make a small batch. What I didn’t realize is that even though I’m getting the same 5870 model there seems to be two distinct variations of it. One is darker and seems to have a dark background and a rubber base and generally looks like the nixie tube equivalent of wearing eyeliner, while the other one is lighter, seems much more transparent, and is all glass at the bottom. The dark tubes have more contrast than the light tubes which surprised me. I even tried to change up the zener diode value but no change. It's innate to the tube.I think it’s all good either way but I was surprised to find the same model number can seem so different.
| SN01 Battery Life I built up SN01 by itself to get a handle of how to build stuff. For SN02 and on I’ll be batch processing like 5 at a time with a predetermined test procedure for each part SN01 is going to my old mentor so it’s fitting that I cut my teeth for this production line on the watch that is earmarked for him. Once the whole thing was packaged up I charged it up to 100%, I let it sit there, checking it only once a day to read its battery “count” level. The sucker lasted 29 days which is pretty much in line with my old predictions. In the picture below you can see a count of 992 corresponding to 100% and the count just after 831 would have been the 10% mark after which the watch doesn’t light the tubes due to low battery. | 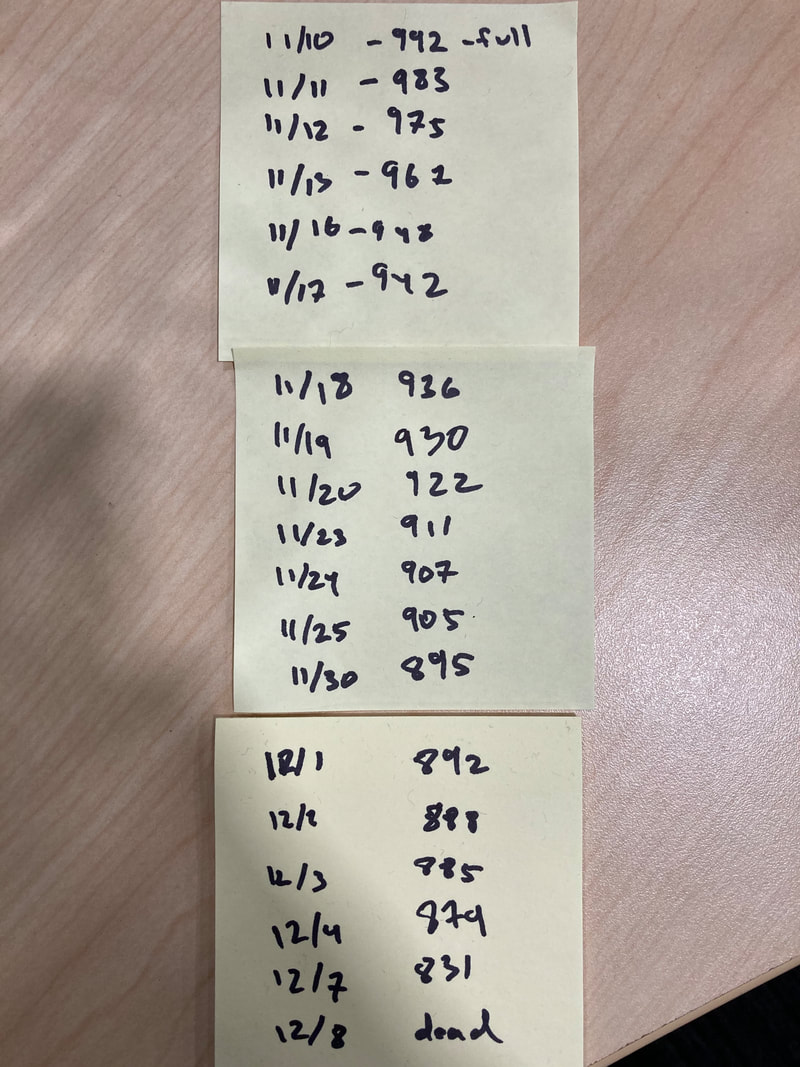 |
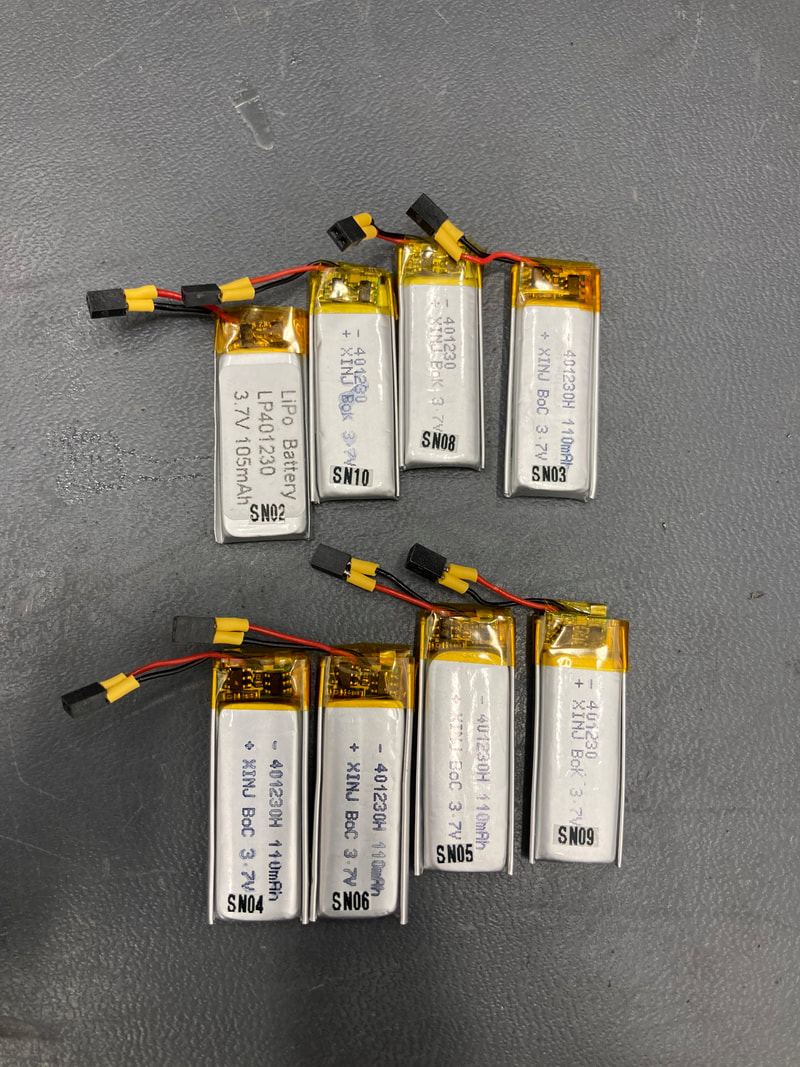
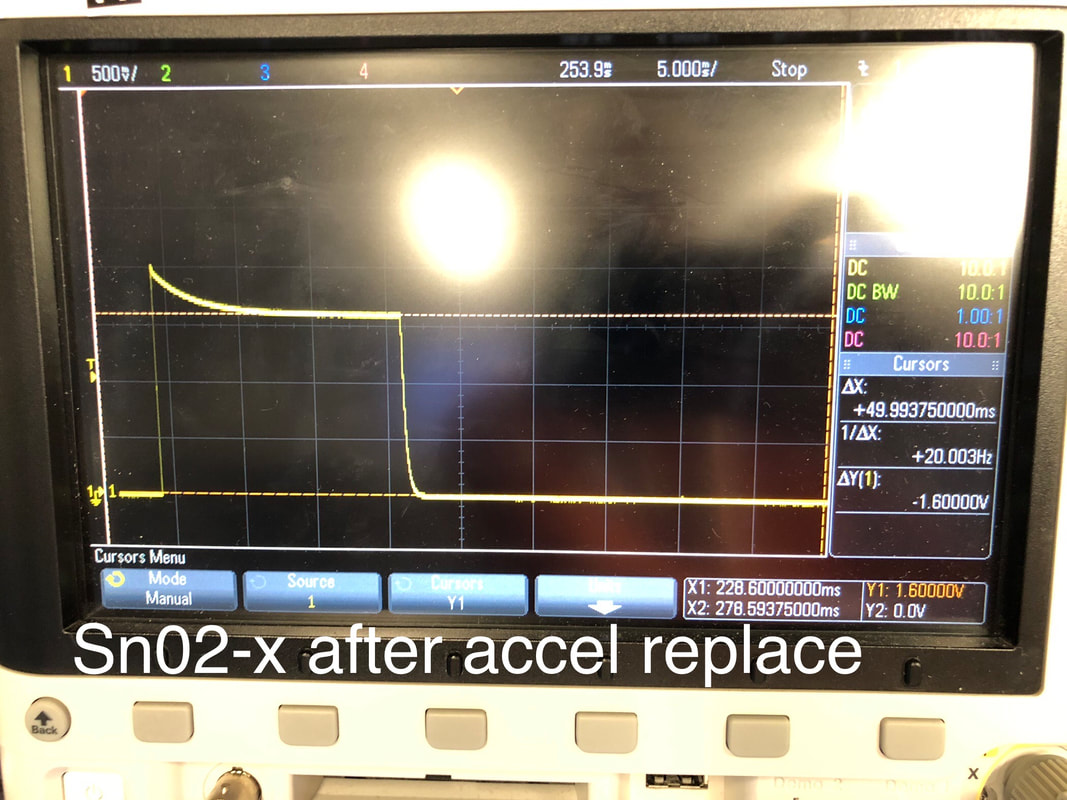
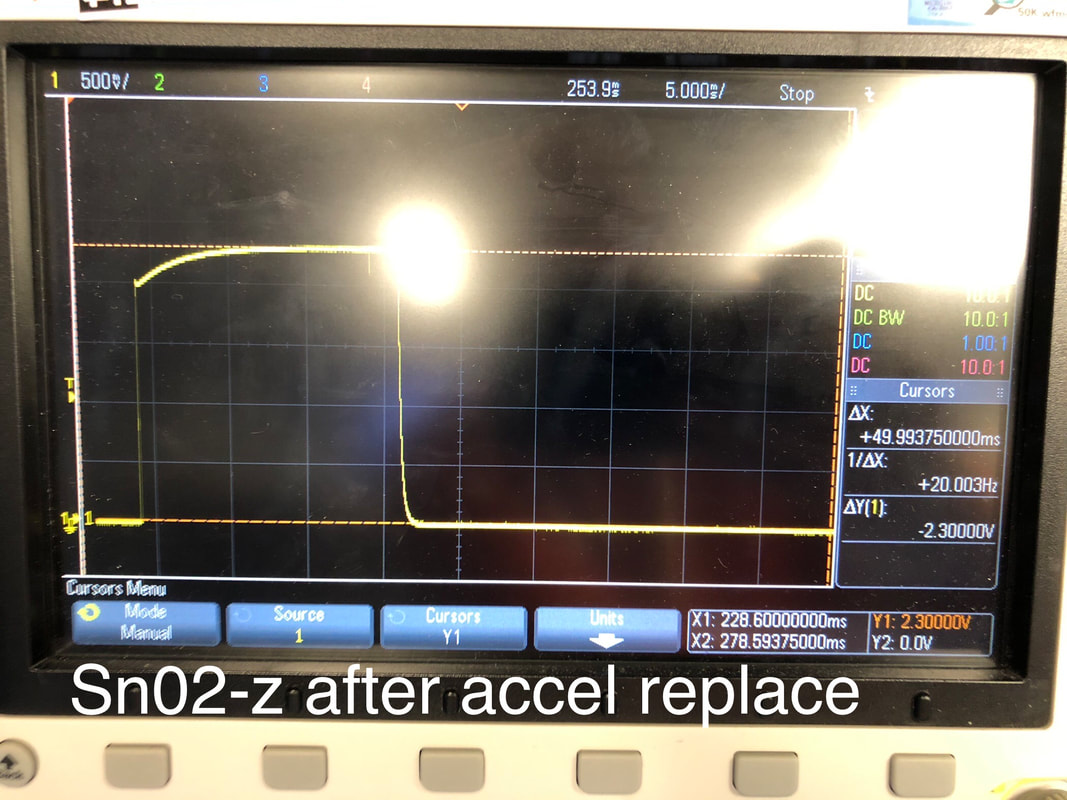
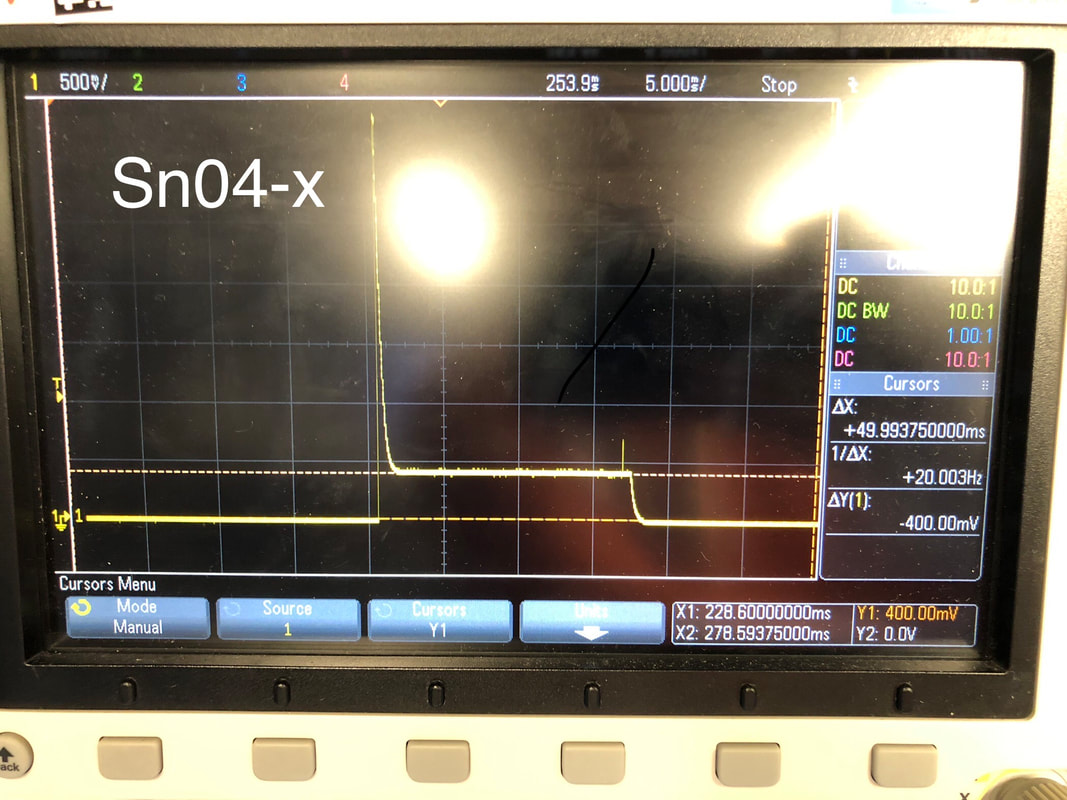
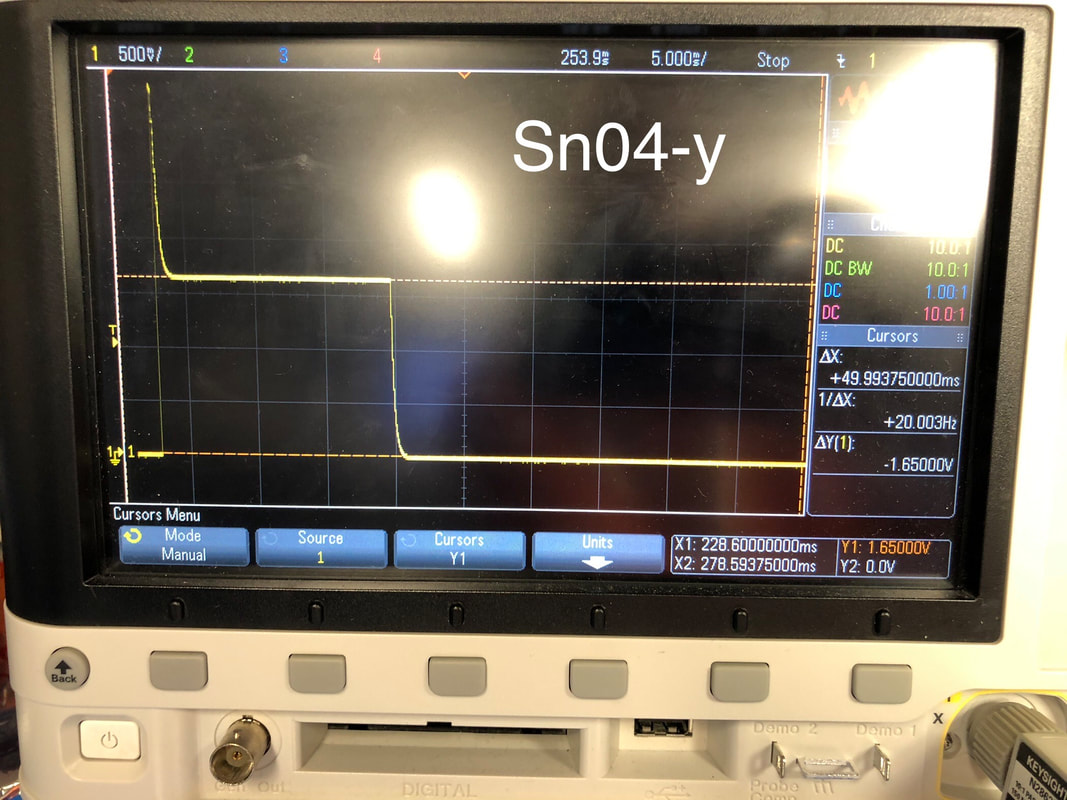
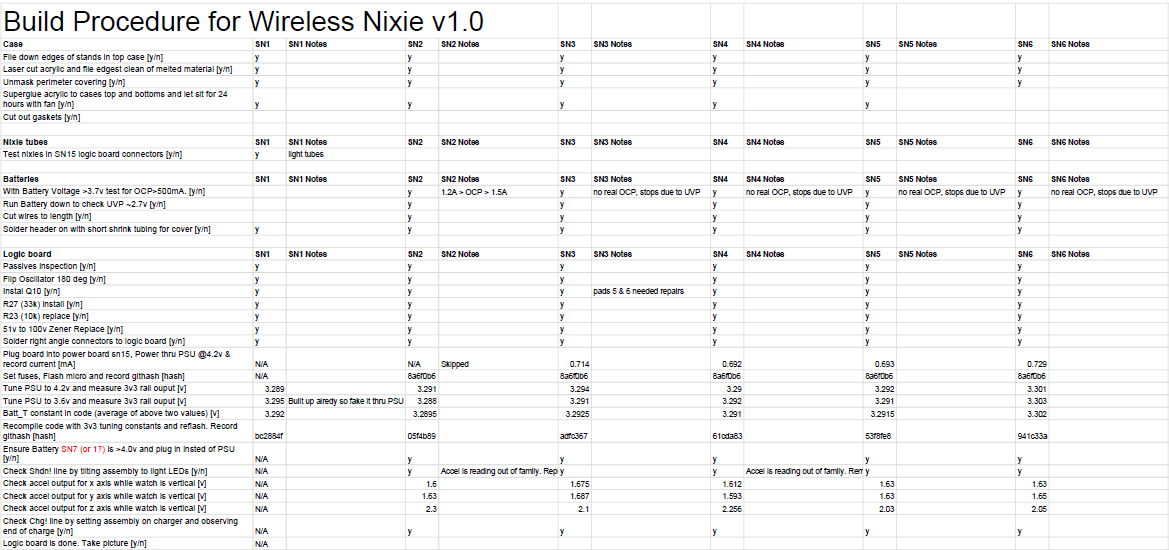
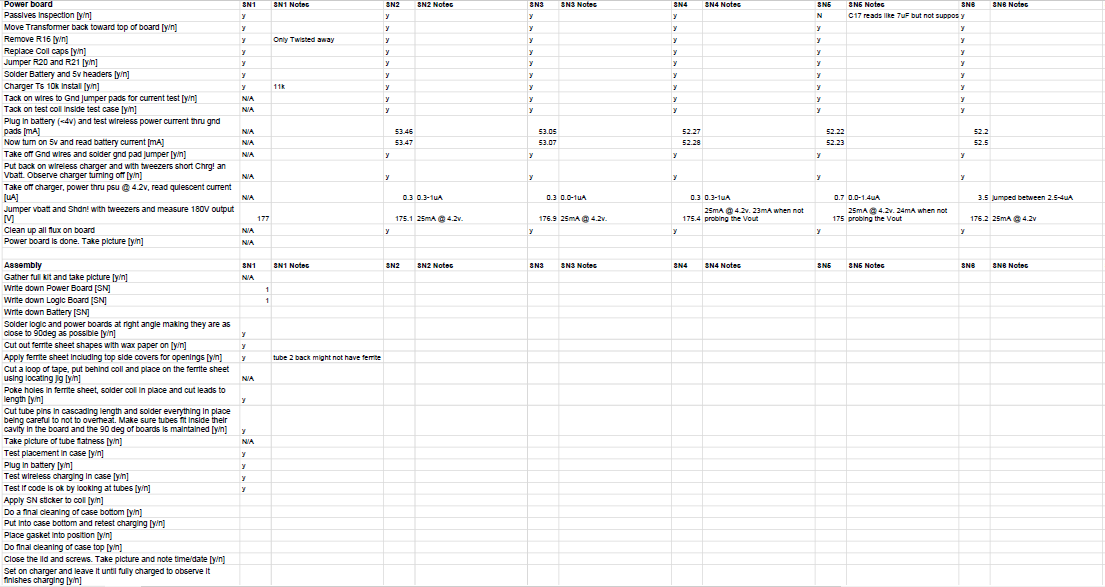
Batch Processing and Accel Problem
I started to put together watches SN02 thru SN06 based on the test procedures I had created off of SN01. Man these things take time to build! I’ve introduced so many checks and double checks to make sure I’m not taking people’s money for a crappy product but damn it’s hours of work just to assemble and test this guy. A lot of this stems from the fact that this was a low volume fab, that it was on a budget, and it was the first run so if I ever do another run I’m sure it’ll be an order of magnitude easier. I’m glad I’m being meticulous though because I already found two accelerometers that weren’t functioning correctly! If I had soldered the tubes on already for these boards it would have been game over probably but my forethought in testing the boards each step of the way saved my ass (and some tubes!). I replaced the accelerometers and they work just fine now. I’m guessing the board house in Shenzhen didn’t follow the guidelines on how hot to make their reflow oven and messed up this part. If I do another bigger run I’m sure I’ll be using a more reputable place so I can just trust things work… at least a little bit.
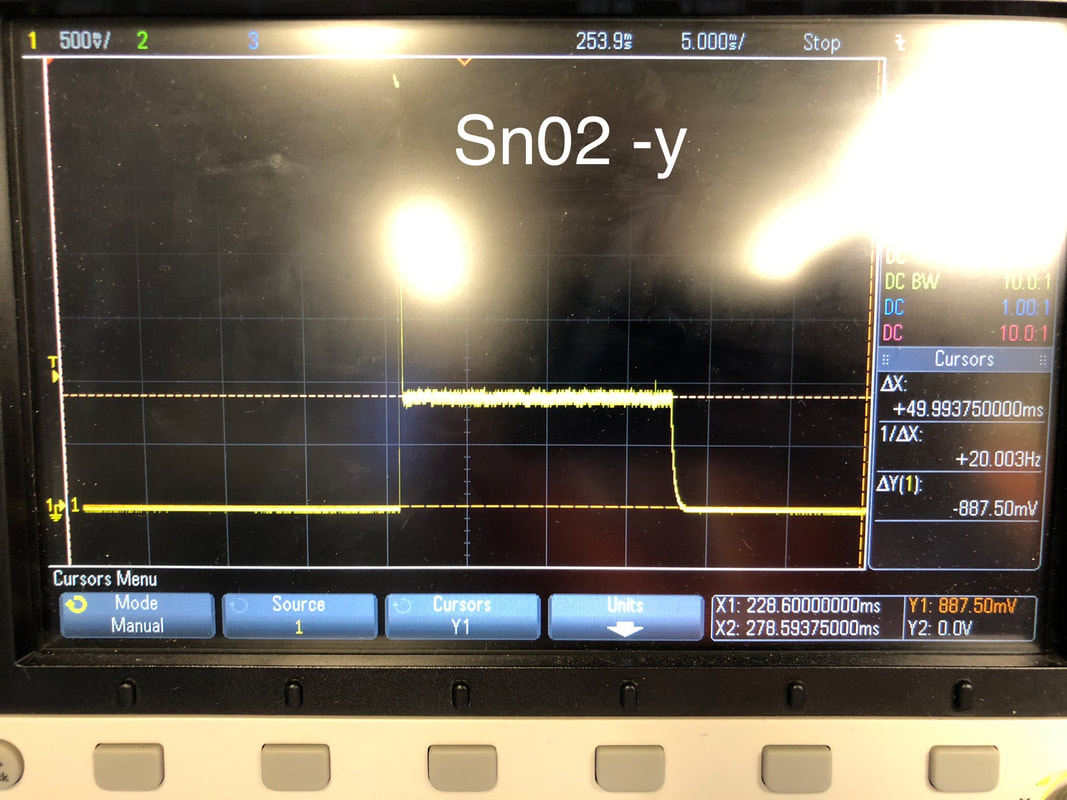
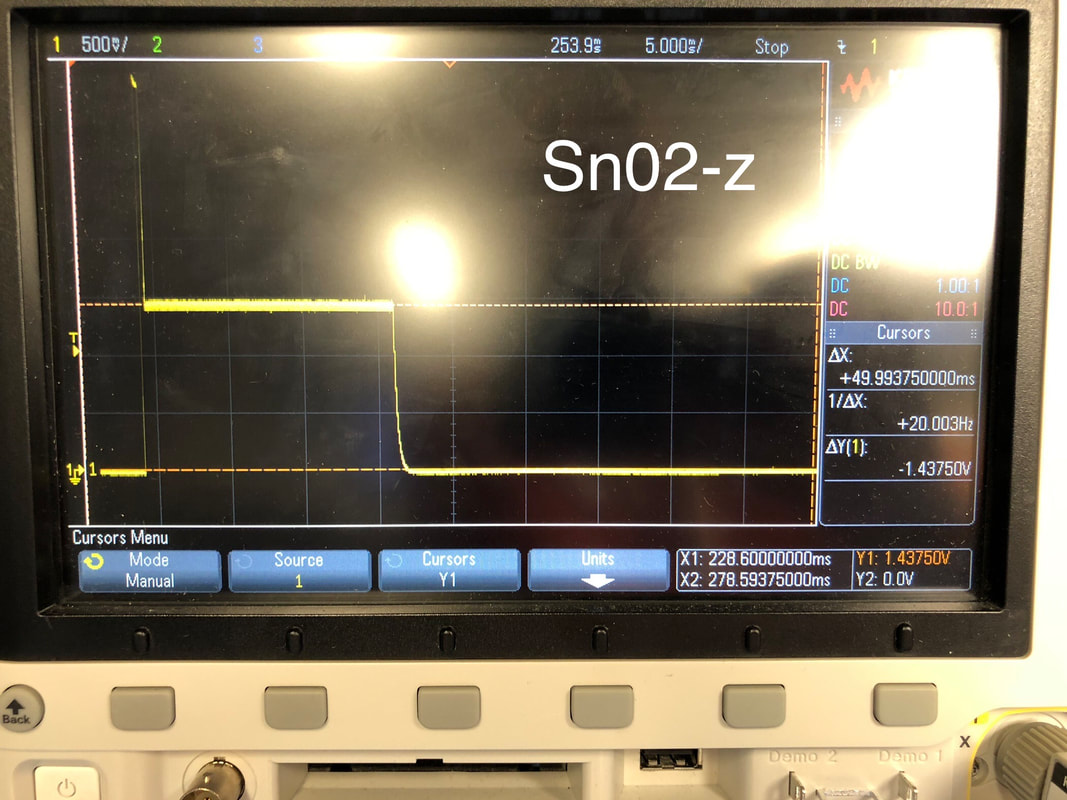
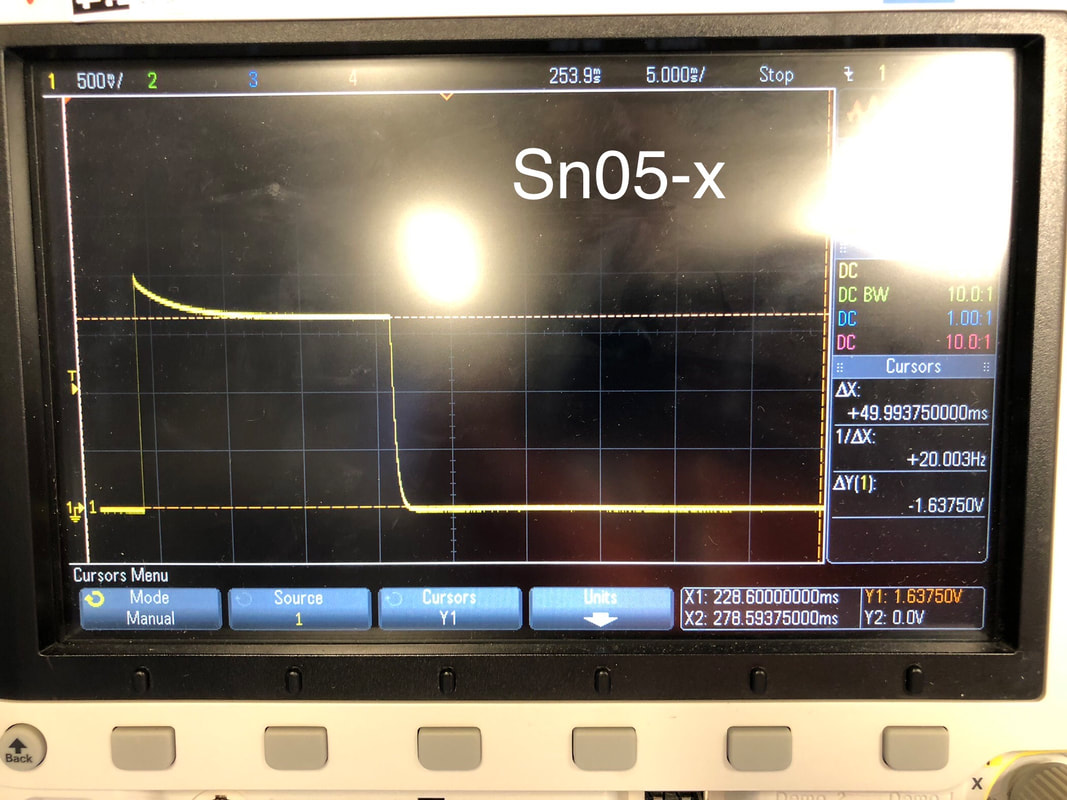
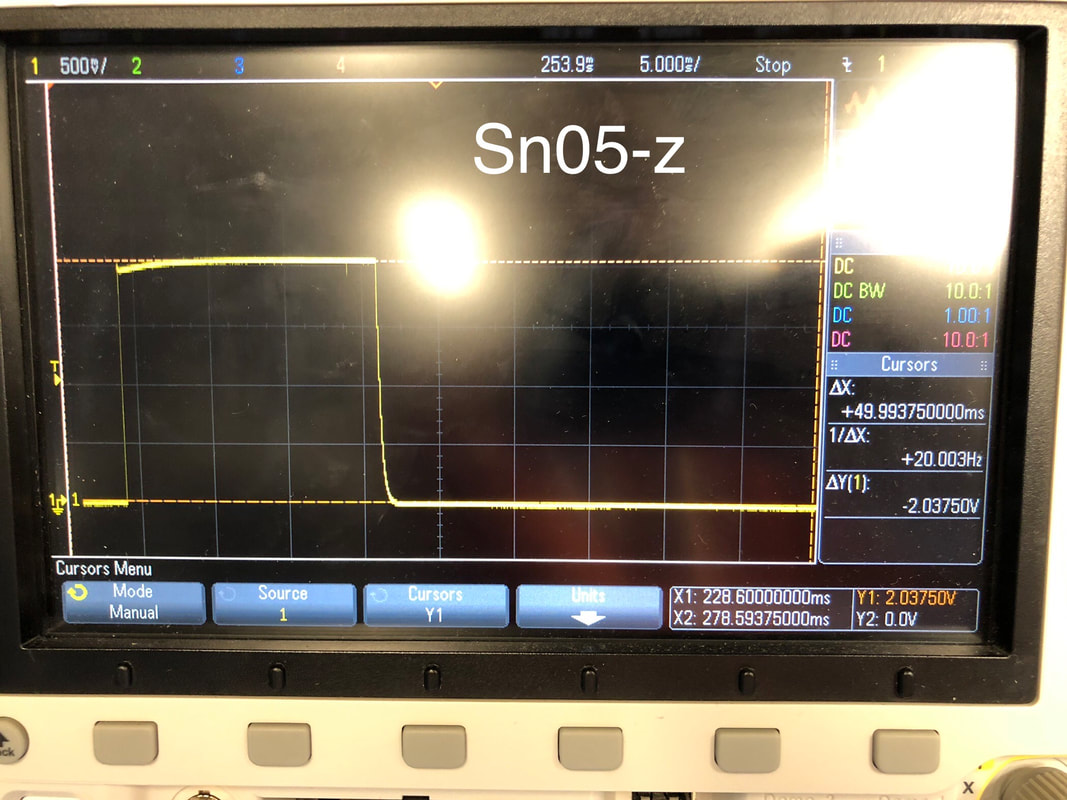
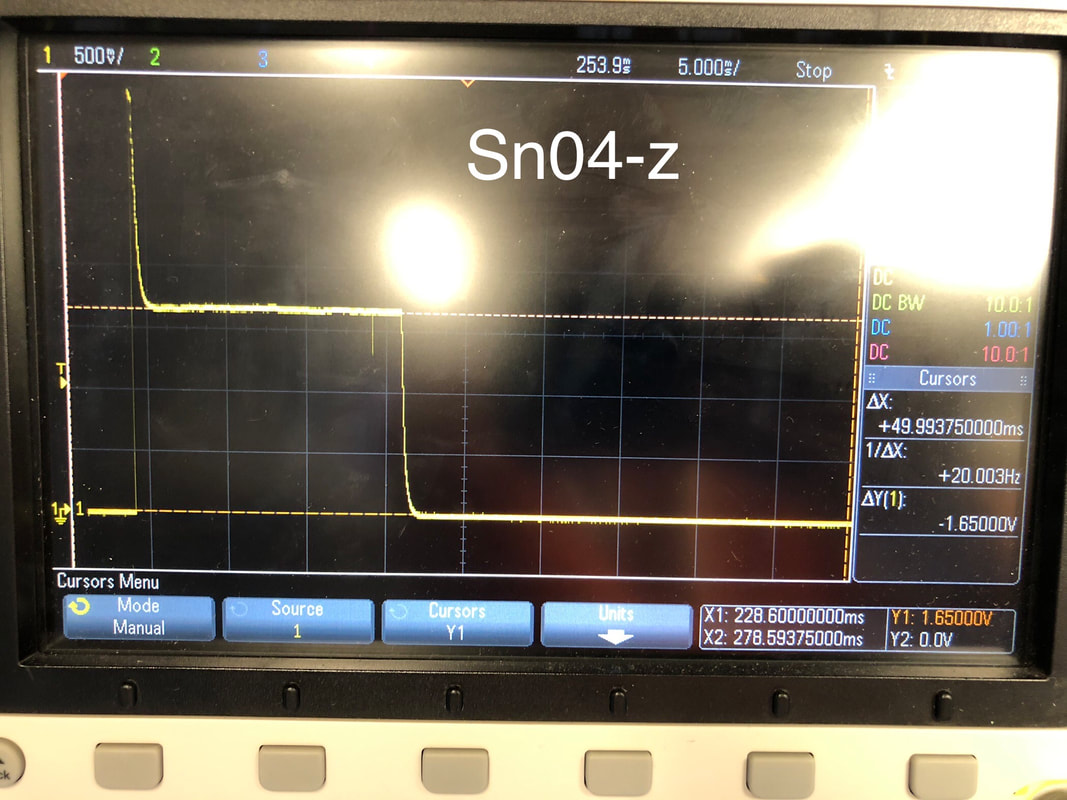
Below you can see SN02 and SN04 are acting different as compared to SN05 (the good one). And when I replace SN02's accel it acts like SN05.
I started to put together watches SN02 thru SN06 based on the test procedures I had created off of SN01. Man these things take time to build! I’ve introduced so many checks and double checks to make sure I’m not taking people’s money for a crappy product but damn it’s hours of work just to assemble and test this guy. A lot of this stems from the fact that this was a low volume fab, that it was on a budget, and it was the first run so if I ever do another run I’m sure it’ll be an order of magnitude easier. I’m glad I’m being meticulous though because I already found two accelerometers that weren’t functioning correctly! If I had soldered the tubes on already for these boards it would have been game over probably but my forethought in testing the boards each step of the way saved my ass (and some tubes!). I replaced the accelerometers and they work just fine now. I’m guessing the board house in Shenzhen didn’t follow the guidelines on how hot to make their reflow oven and messed up this part. If I do another bigger run I’m sure I’ll be using a more reputable place so I can just trust things work… at least a little bit.
Below you can see SN02 and SN04 are acting different as compared to SN05 (the good one). And when I replace SN02's accel it acts like SN05.


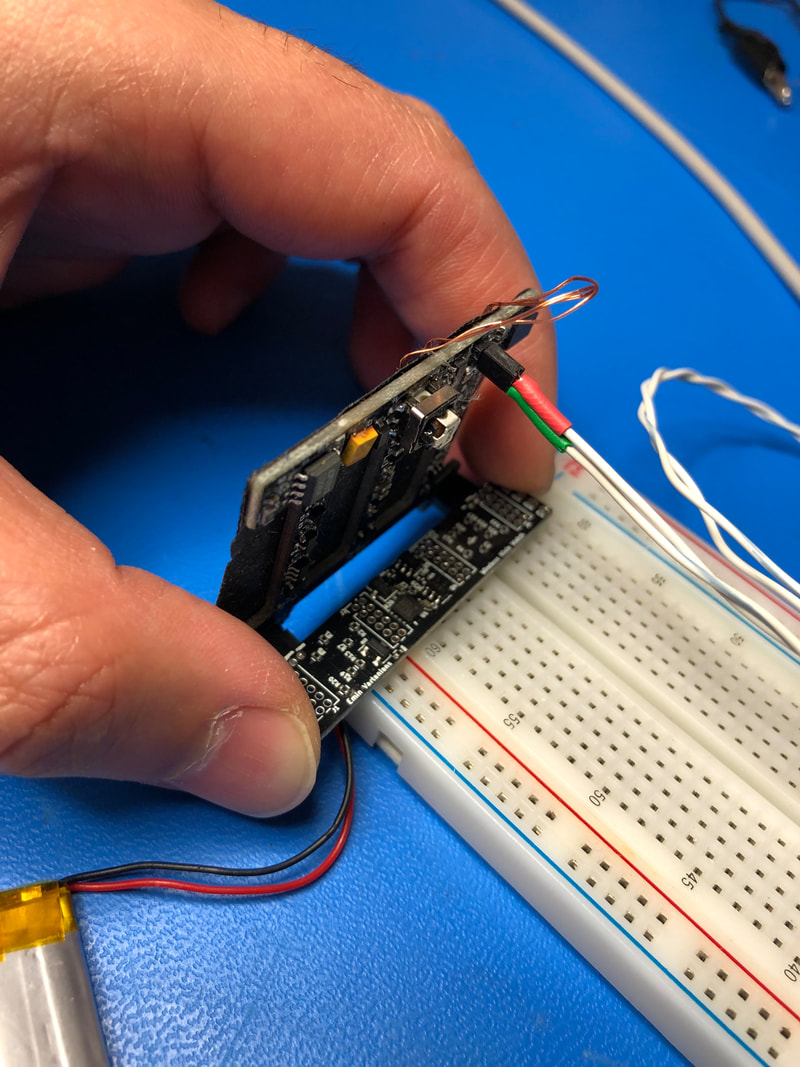
The above test is done for all the watches now which is an unfortunate necessity. Below you can see the configuration the boards are in when I do this test plus a snapshot of the big assembly procedure log I have going on to record what happens on these builds. Batch processing is a ton of work!
 |   |
Next Steps:
I’m working on SN02-06 and right now I’m at the point of bringing the Logic and Power boards together and soldering tubes on. I want to make sure the tubes work fully before I solder them in place so that’ll be an extra step to test, plus little things like laser cutting gaskets is still outstanding. Otherwise, hopefully next post I can show you guys 6 fully completed watches going thru final inspection!
I’m working on SN02-06 and right now I’m at the point of bringing the Logic and Power boards together and soldering tubes on. I want to make sure the tubes work fully before I solder them in place so that’ll be an extra step to test, plus little things like laser cutting gaskets is still outstanding. Otherwise, hopefully next post I can show you guys 6 fully completed watches going thru final inspection!