Magnets Are Out
I had second thoughts about the magnets holding the faceplate. It's a bit flimsy and ultimately it lead me to hold the PCB down in a weird way. My fiance suggested screws on each corner at the top and bottom, this way they don't show when you're looking at the time and can be the same color as the anodizing to hide them. So four screws, 1 at each corner, posts from the face plate come down and hold the PCB down to the base plate on little platforms. I also downloaded a sketchup plug-in called "RoundCorner" which makes really nice corners so the bottom sides are much more sleek. I went back to the square window in the back which now with the rounded sides looks really nice. Lastly, I had to settle on a right angle header which will carry the signals between logic and power boards as well as provide a way for the logic board to be mounted in place perpendicular to the power board.
I had second thoughts about the magnets holding the faceplate. It's a bit flimsy and ultimately it lead me to hold the PCB down in a weird way. My fiance suggested screws on each corner at the top and bottom, this way they don't show when you're looking at the time and can be the same color as the anodizing to hide them. So four screws, 1 at each corner, posts from the face plate come down and hold the PCB down to the base plate on little platforms. I also downloaded a sketchup plug-in called "RoundCorner" which makes really nice corners so the bottom sides are much more sleek. I went back to the square window in the back which now with the rounded sides looks really nice. Lastly, I had to settle on a right angle header which will carry the signals between logic and power boards as well as provide a way for the logic board to be mounted in place perpendicular to the power board.
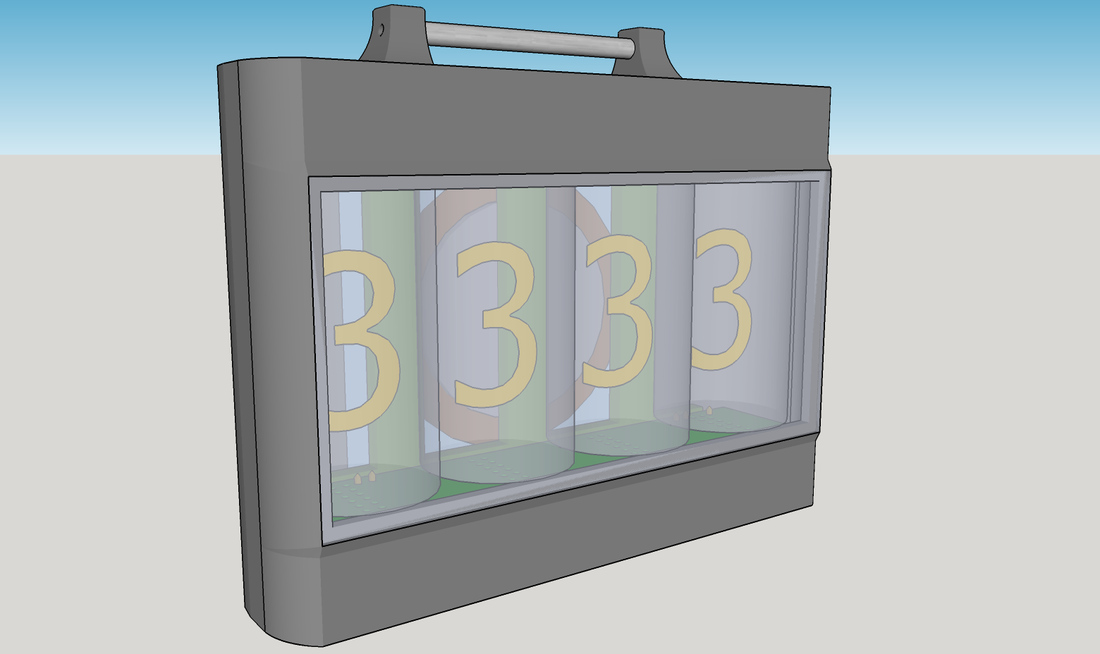 Nice sleep black look with a small bezel around the window. | 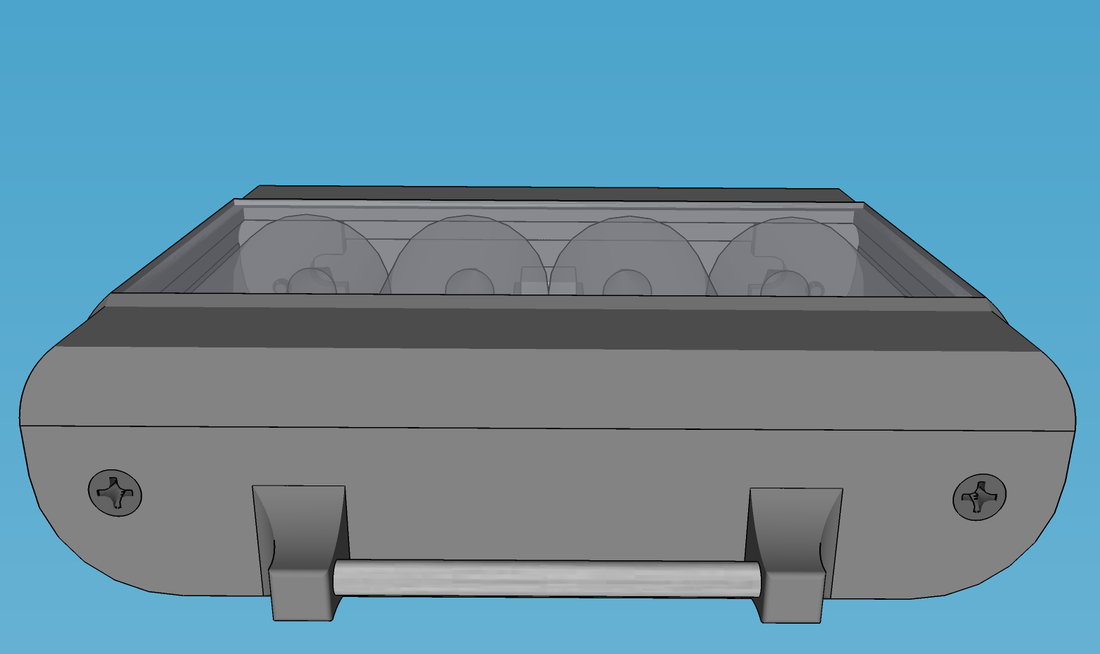 #0-80 screws holding the faceplate down. The curved bottom sides look great now. | 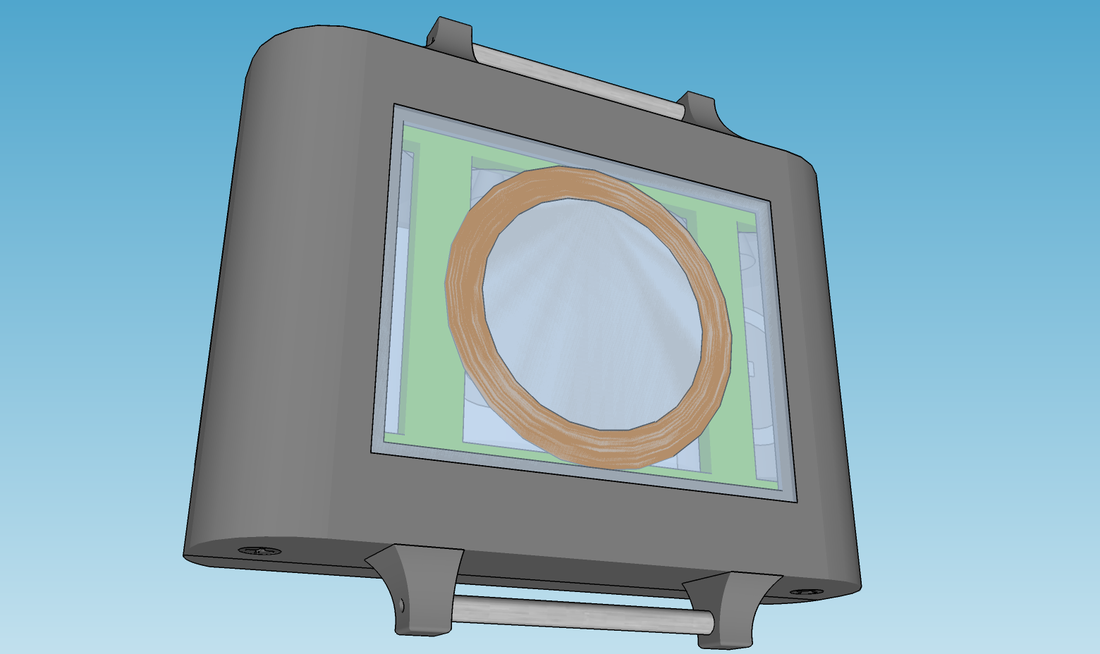 New rectangular window showing the innards again. |
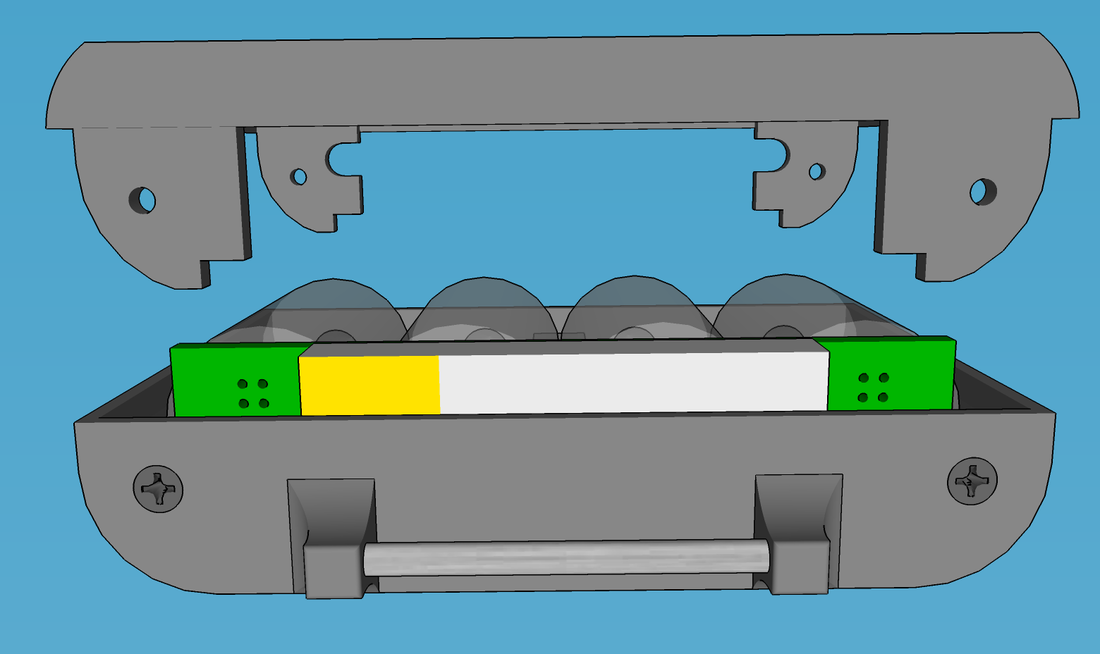 Power board gets held down with little notches on posts that come down from the face plate. |  The power PCB sits on small platforms at each corner of the base plate. | 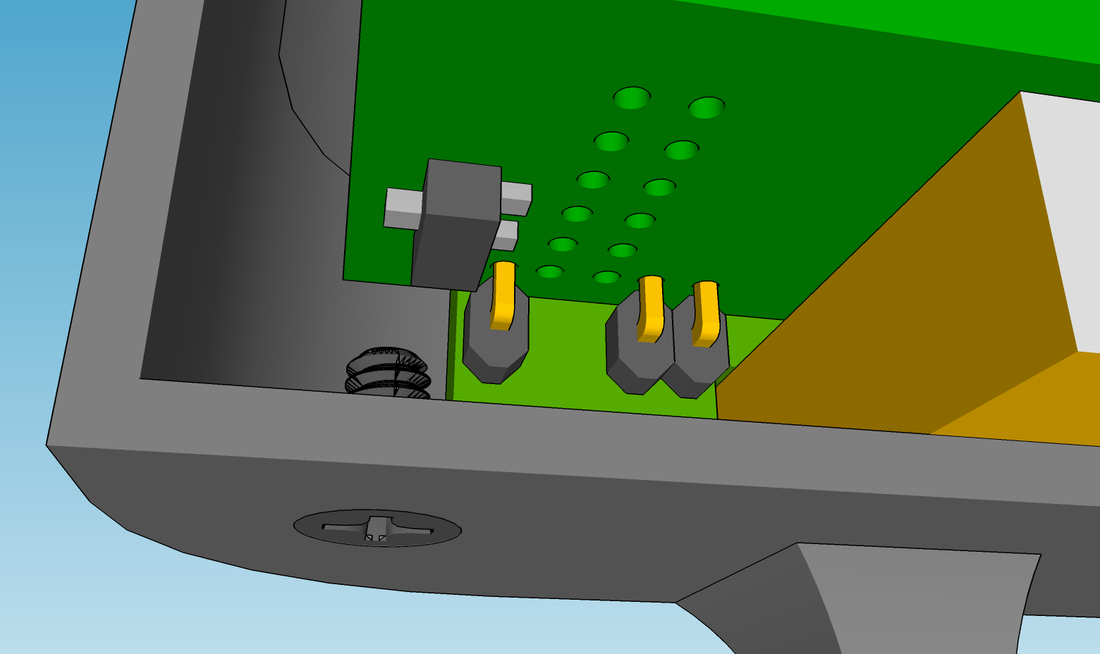 Logic board gets held by tiny 0.050" pitch right angle headers so its rigidly connected to the power board |
Logic PCB
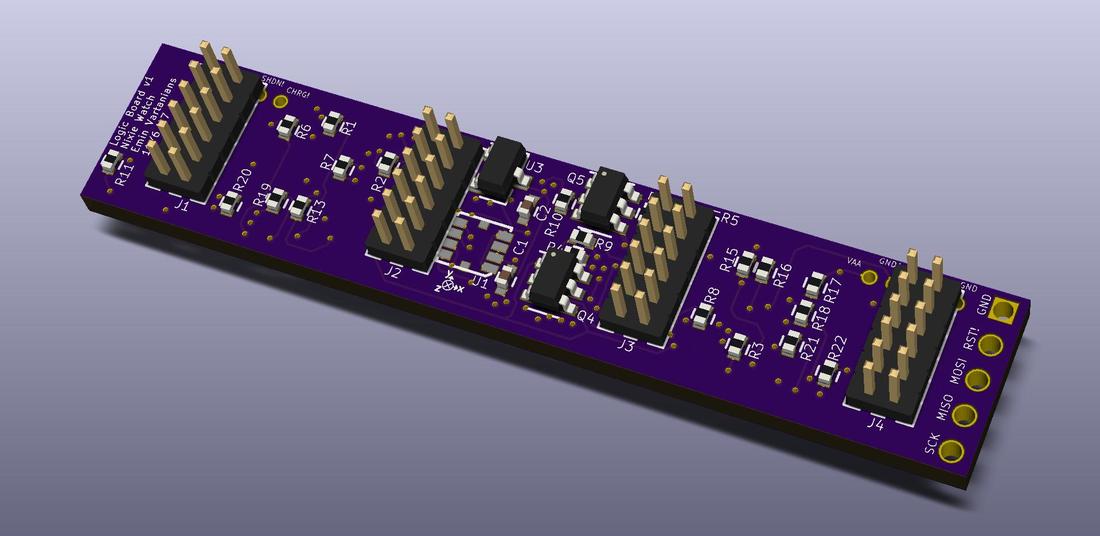
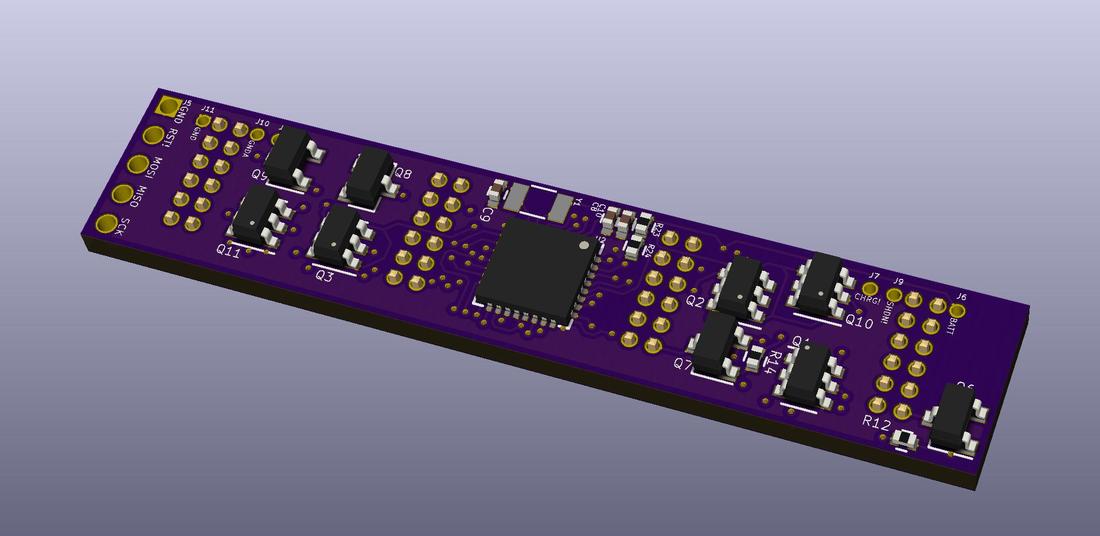
I finished the schematic and layout of the logic PCB. I'll post the full KiCad project once I'm done with the BOM. I plan on getting my PCB manufactured from OSHPark which quotes qty 3 of this board at $7 which is crazy cheap. OSHPark has great capabilities too: 5/5 spacing, 4 mil annular ring, 10 mil drill size. I'm also looking into re-flowing the board for assembly. Normal places charge upwards of $400 for SMT assembly which is too expensive for me. I'd hand assemble it but I'm trying to sell a few of these which will get annoying. OSHStencils sell a stencil for dirt cheap so I'm checking that out. That way I'd have to spend some time to place and re-flow the components but it might be simple enough. There's also Deegou Electronics which does both fab and assembly, I'm not 100% convinced yet of their stuff but will have to look deeper.
I finished the schematic and layout of the logic PCB. I'll post the full KiCad project once I'm done with the BOM. I plan on getting my PCB manufactured from OSHPark which quotes qty 3 of this board at $7 which is crazy cheap. OSHPark has great capabilities too: 5/5 spacing, 4 mil annular ring, 10 mil drill size. I'm also looking into re-flowing the board for assembly. Normal places charge upwards of $400 for SMT assembly which is too expensive for me. I'd hand assemble it but I'm trying to sell a few of these which will get annoying. OSHStencils sell a stencil for dirt cheap so I'm checking that out. That way I'd have to spend some time to place and re-flow the components but it might be simple enough. There's also Deegou Electronics which does both fab and assembly, I'm not 100% convinced yet of their stuff but will have to look deeper.
 |  |
Battery
I think I've mentioned before that I'm look to buy this battery from All-battery which is small enough to fit the tiny area below the logic board but has enough capacity for a decent amount of charge. The battery comes as just the cell so I need a protection circuit. I'm going between either Diodes Inc "AP9101C" line or TI's "bq297xx" line of protection modules. These IC's sense the current and voltage and control outside access to the batteries through a pair of n-channel mosfets. I'm aiming to make the protection circuitry a tiny board that I can tape on the battery itself so instead of tabs I can have a normal battery interface. I think I'll have to buy the battery first and measure its dimensions to be sure I can nestle a tiny PCB in its envelope.
Next Steps
Gotta make the protection circuitry schematic and maybe even lay it out. Then look into buying the battery and seeing if the protection circuitry can fit as a standalone board. Then I'll probably start the power board schematic and layout. I gotta finish up the BOM of the logic board too, but I'm thinking I should assemble one board first to make sure it works before starting on the other. All the while I'll be looking more info manufacturing with stencils or a turn key place and whenever I can I'll wind a couple coils on some double sided tape to see how easy that task is.
